Using the Cordova API: Pushwoosh: Difference between revisions
m Ghenne moved page Using the PhoneGap API: Pushwoosh to Using the Cordova API: Pushwoosh |
|||
| (13 intermediate revisions by the same user not shown) | |||
| Line 1: | Line 1: | ||
This Tech Note is largely obsolete - both PushWoosh and Google have changed their interfaces. See the following docs: | |||
http://docs.pushwoosh.com/docs/phonegap-build | |||
http://docs.pushwoosh.com/docs/fcm-configuration | |||
https://www.joshmorony.com/setting-up-the-pushwoosh-plugin-with-phonegap-build/ | |||
== Introduction == | |||
The Pushwoosh API lets you send notifications from your computer to your app running on the device. While your app is running, if a notification is received, a function in your app will be called with the contents of the notification. It can then take whatever action needed based on the incoming data. | The Pushwoosh API lets you send notifications from your computer to your app running on the device. While your app is running, if a notification is received, a function in your app will be called with the contents of the notification. It can then take whatever action needed based on the incoming data. | ||
Notifications are a way to send and receive messages from your device. They have the ability to be broadcast to large numbers of devices. For Android, [http://en.wikipedia.org/wiki/Google_Cloud_Messaging Google Cloud Messaging] is used. For iOS, it uses the [http://en.wikipedia.org/wiki/Apple_Push_Notification_Service Apple Push Notification Service]. | |||
== How to send and receive a message == | == How to send and receive a message == | ||
| Line 17: | Line 30: | ||
=== Set up a Pushwoosh account === | === Set up a Pushwoosh account === | ||
For testing, all you need is a free account. It lets you send notifications for up to 5 apps on | For testing, all you need is a free account. It lets you send notifications for up to 5 apps on 500,000 devices. | ||
http://www.pushwoosh.com/pricing/ | http://www.pushwoosh.com/pricing/ | ||
| Line 56: | Line 69: | ||
== Creating an AppStudio App == | |||
=== Add the Pushwoosh Plugin to your project === | |||
Now that everything is set up on the sending side, let's create an Android app which can receive notifications. To do this, we need to use the [https://build.phonegap.com/plugins/150 Pushwoosh PhoneGap Plugin]. | |||
You can see this app in Samples folder 7. You will need AppStudio 4.1.3 or higher to run this sample. | |||
To include this in your project, you need to do two things. | |||
1. In Project Properties, add Pushwoosh to your Phonegap config property, by adding the following lines to it: | |||
<pre> | |||
<gap:plugin name="org.apache.cordova.device" /> | |||
<gap:plugin name="com.pushwoosh.plugins.pushwoosh" /> | |||
<access origin="*"/> <!-- allow all pages, use for development --> | |||
<access origin="*.pushwoosh.com"/> <!-- allow pushwoosh service --> | |||
</pre> | |||
2. In Project Properties, add the follow line to extraheaders: | |||
<pre> | |||
<script src="PushNotification.js"></script> | |||
</pre> | |||
=== Add the code to respond to a notification === | |||
1. Add code to listen to events. There are a couple of events we care about: when the app is completely loaded, and when a notification comes in: | |||
<pre> | |||
Sub Main() | |||
if typeof(cordova)="undefined" Then | |||
MsgBox "This sample only runs as a native app." | |||
Exit Sub | |||
End if | |||
document.addEventListener("deviceready", initPushwoosh, True) | |||
document.addEventListener("push-notification", notificationReceived) | |||
End Sub | |||
</pre> | |||
* When the app is completely loaded, call initPushwoosh. | |||
* When a notification comes in, call notificationReceieved. | |||
2. Respond to the app being completely loaded: | |||
<pre> | |||
Sub initPushwoosh() | |||
Dim pushNotification = window.plugins.pushNotification; | |||
pushNotification.onDeviceReady(); | |||
pushNotification.registerDevice({projectid:"938103699235", appid:"5ED97-CF044"}, initSuccess, initFail) | |||
End Sub | |||
</pre> | |||
* Here is where we fill in the projectid and appid that we got from setting up Pushwoosh. | |||
* We also have subroutines which get called if the initialization succeeds or fails. | |||
* If the notification succeeds, we get a status message back with the push token. | |||
<pre> | |||
Sub initSuccess(status) | |||
MsgBox "push token: " & status | |||
End Sub | |||
</pre> | |||
3. Respond to a notification being received: | |||
<pre> | |||
Sub notificationReceived(event) | |||
Dim message | |||
message=event.notification.message | |||
MsgBox "message:" & message | |||
End Sub | |||
</pre> | |||
* This will only work if the app is running in the foreground. If it is in the background, the MsgBox won't show. | |||
=== Compile App using PhoneGap === | |||
The rest is the same as any PhoneGap app. | |||
* Use the "Build Native App using PhoneGap" option on the Run menu to upload your project. | |||
* Download it from the "Get Native Build Status" screen. | |||
* Install to your device. | |||
* Run the app. | |||
* The push token should appear right away. | |||
== Closing Notes == | |||
This technote only begins to show what can be done with Notifications. Pushwoosh have a [http://www.pushwoosh.com/programming-push-notification/pushwoosh-push-notification-remote-api/ complete API], which include features such as | |||
* createMessage | |||
* deleteMessage | |||
* registerDevice | |||
* unregisterDevice | |||
* setTags | |||
* setBadge | |||
* pushStat | |||
* getNearestZone | |||
Apps can send notifications as well, up to 10 megs in size. | |||
This sample is for Android. iOS has a different authentication scheme: the main difference is in the initPushwoosh() function. | |||
== JavaScript version of the code == | |||
<pre> | |||
function Main() { | |||
if(typeof(cordova)=="undefined") { | |||
_msgbox_confirm("This sample will only run if compiled using PhoneGap Build and run as a native app."); | |||
return; | |||
} | |||
document.addEventListener("deviceready" , initPushwoosh, True); | |||
document.addEventListener("push-notification" , notificationReceived); | |||
} | |||
function notificationReceived(event) { | |||
var message; | |||
message=event.notification.message; | |||
_msgbox_confirm("message:" + message); | |||
} | |||
function initPushwoosh() { | |||
var pushNotification = window.plugins.pushNotification; | |||
pushNotification.onDeviceReady(); | |||
pushNotification.registerDevice({projectid:"938103699235" , appid:"5ED97-CF044"}, initSuccess, initFail); | |||
} | |||
function initSuccess(status) { | |||
msg("push token: " + status); | |||
} | |||
function initFail(status) { | |||
msg(JSON.stringify("failed to register " + status)); | |||
} | |||
function msg(s) { | |||
txtLog.text=s + '\n' + txtLog.text; | |||
} | |||
</pre> | |||
Revision as of 16:25, 10 November 2020
This Tech Note is largely obsolete - both PushWoosh and Google have changed their interfaces. See the following docs:
http://docs.pushwoosh.com/docs/phonegap-build
http://docs.pushwoosh.com/docs/fcm-configuration
https://www.joshmorony.com/setting-up-the-pushwoosh-plugin-with-phonegap-build/
Introduction
The Pushwoosh API lets you send notifications from your computer to your app running on the device. While your app is running, if a notification is received, a function in your app will be called with the contents of the notification. It can then take whatever action needed based on the incoming data.
Notifications are a way to send and receive messages from your device. They have the ability to be broadcast to large numbers of devices. For Android, Google Cloud Messaging is used. For iOS, it uses the Apple Push Notification Service.
How to send and receive a message
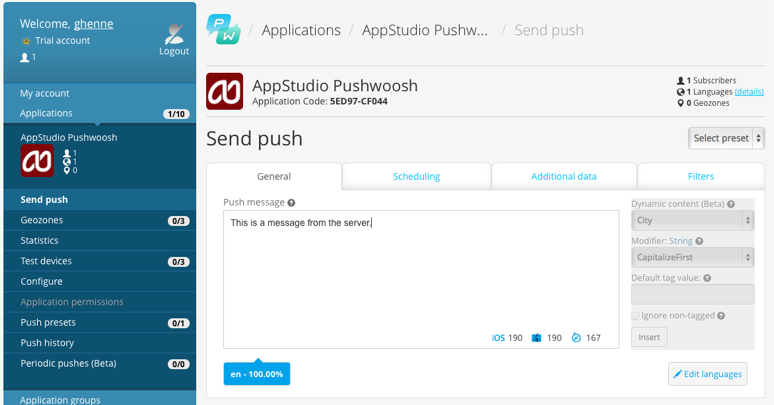
Let's send a simple message to a device. We're assuming everything is set up already. We will cover how to set things up later.
In Pushwoosh, we can compose and send a notification to our app. There are other ways to send notifications: this is the easiest.
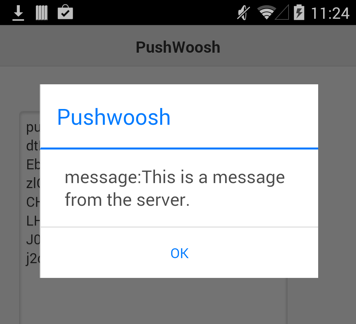
On the device, we already have our Pushwoosh app running. It is written in AppStudio. A moment or two after we sent the message, this appears:
Setting up Notifications
Set up a Pushwoosh account
For testing, all you need is a free account. It lets you send notifications for up to 5 apps on 500,000 devices. http://www.pushwoosh.com/pricing/
Set up your application
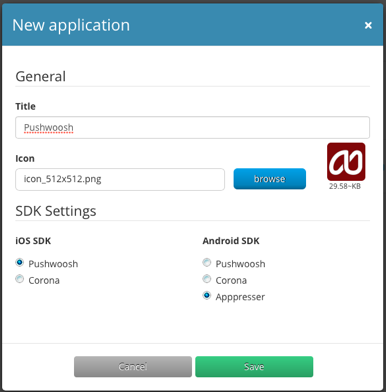
You need to set up each AppStudio app in Pushwoosh: https://cp.pushwoosh.com/applications
- Set Title to the name of your app.
- Select your icon. Any size seems to work - the bigger the better
- Under Android SDK, select Appresser to set the format of the data being sent.
Get Google Cloud Application ID
Pushwoosh has good instructions for this step here: http://www.pushwoosh.com/programming-push-notification/android/android-gcm-api-configuration/
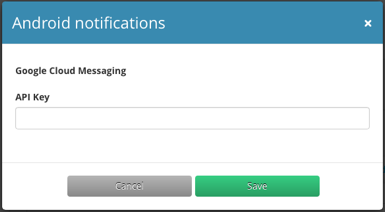
The end result will be to get an API Key, a number which looks like 938103699235. This will be used later as your projected in your AppStudio program.
The platform settings give specific configuration information for the platform. Choose your project from "Applications", then click on the Android "configure" tab. You will get this:
Get the appid
The appid appears on the list of applications. You'll need this number for your AppStudio program.
Creating an AppStudio App
Add the Pushwoosh Plugin to your project
Now that everything is set up on the sending side, let's create an Android app which can receive notifications. To do this, we need to use the Pushwoosh PhoneGap Plugin.
You can see this app in Samples folder 7. You will need AppStudio 4.1.3 or higher to run this sample.
To include this in your project, you need to do two things.
1. In Project Properties, add Pushwoosh to your Phonegap config property, by adding the following lines to it:
<gap:plugin name="org.apache.cordova.device" />
<gap:plugin name="com.pushwoosh.plugins.pushwoosh" />
<access origin="*"/> <!-- allow all pages, use for development -->
<access origin="*.pushwoosh.com"/> <!-- allow pushwoosh service -->
2. In Project Properties, add the follow line to extraheaders:
<script src="PushNotification.js"></script>
Add the code to respond to a notification
1. Add code to listen to events. There are a couple of events we care about: when the app is completely loaded, and when a notification comes in:
Sub Main()
  if typeof(cordova)="undefined" Then
    MsgBox "This sample only runs as a native app."
    Exit Sub
  End if
  document.addEventListener("deviceready", initPushwoosh, True)
  document.addEventListener("push-notification", notificationReceived)
End Sub
- When the app is completely loaded, call initPushwoosh.
- When a notification comes in, call notificationReceieved.
2. Respond to the app being completely loaded:
Sub initPushwoosh()
  Dim pushNotification = window.plugins.pushNotification;
  pushNotification.onDeviceReady();
  pushNotification.registerDevice({projectid:"938103699235", appid:"5ED97-CF044"}, initSuccess, initFail)
End Sub
- Here is where we fill in the projectid and appid that we got from setting up Pushwoosh.
- We also have subroutines which get called if the initialization succeeds or fails.
- If the notification succeeds, we get a status message back with the push token.
Sub initSuccess(status)
  MsgBox "push token: " & status
End Sub
3. Respond to a notification being received:
Sub notificationReceived(event)
  Dim message
  message=event.notification.message
  MsgBox "message:" & message
End Sub
- This will only work if the app is running in the foreground. If it is in the background, the MsgBox won't show.
Compile App using PhoneGap
The rest is the same as any PhoneGap app.
- Use the "Build Native App using PhoneGap" option on the Run menu to upload your project.
- Download it from the "Get Native Build Status" screen.
- Install to your device.
- Run the app.
- The push token should appear right away.
Closing Notes
This technote only begins to show what can be done with Notifications. Pushwoosh have a complete API, which include features such as
- createMessage
- deleteMessage
- registerDevice
- unregisterDevice
- setTags
- setBadge
- pushStat
- getNearestZone
Apps can send notifications as well, up to 10 megs in size.
This sample is for Android. iOS has a different authentication scheme: the main difference is in the initPushwoosh() function.
JavaScript version of the code
 function Main() {
  if(typeof(cordova)=="undefined") {
    _msgbox_confirm("This sample will only run if compiled using PhoneGap Build and run as a native app.");
     return;
  }
  document.addEventListener("deviceready" , initPushwoosh, True);
  document.addEventListener("push-notification" , notificationReceived);
}

function notificationReceived(event) {
 var message;
  message=event.notification.message;
  _msgbox_confirm("message:"  +  message);
}

function initPushwoosh() {
 var pushNotification = window.plugins.pushNotification;
  pushNotification.onDeviceReady();
  pushNotification.registerDevice({projectid:"938103699235" , appid:"5ED97-CF044"}, initSuccess, initFail);
}

function initSuccess(status) {
  msg("push token: "  +  status);
}

function initFail(status) {
  msg(JSON.stringify("failed to register "  +  status));
}

function msg(s) {
  txtLog.text=s  +  '\n'  +  txtLog.text;
}


