Test Server Installation and Configuration: Difference between revisions
| (23 intermediate revisions by 2 users not shown) | |||
| Line 12: | Line 12: | ||
Most modern CPUs are 64-bit. | Most modern CPUs are 64-bit. | ||
These instructions have not been tested on a 32-bit machine. However, they should work with minimum changes. If you are planning to install on a 32-bit machine, you should download the x86 image: http://releases.ubuntu.com/precise/ubuntu-12.04. | These instructions have not been tested on a 32-bit machine. However, they should work with minimum changes. If you are planning to install on a 32-bit machine, you should download the x86 image: http://releases.ubuntu.com/precise/ubuntu-12.04.4-server-i386.iso | ||
== Create Bootable Media == | == Create Bootable Media == | ||
# Download Ubuntu Server 12.04. | # Download Ubuntu Server 12.04.4 LTS 64-bit: http://releases.ubuntu.com/precise/ubuntu-12.04.4-server-amd64.iso | ||
# Determine if you will be writing the ISO file to a CD or a USB drive. | # Determine if you will be writing the ISO file to a CD or a USB drive. | ||
## CD: simply write the ISO image to a writable CD. Detailed instructions are available here for many operating systems: https://help.ubuntu.com/community/BurningIsoHowto | ## CD: simply write the ISO image to a writable CD. Detailed instructions are available here for many operating systems: https://help.ubuntu.com/community/BurningIsoHowto | ||
| Line 29: | Line 29: | ||
# Boot your Ubuntu media. This may require you to either hold down a key during boot or change the boot device order in the BIOS settings. Instructions vary depending on your model of server. | # Boot your Ubuntu media. This may require you to either hold down a key during boot or change the boot device order in the BIOS settings. Instructions vary depending on your model of server. | ||
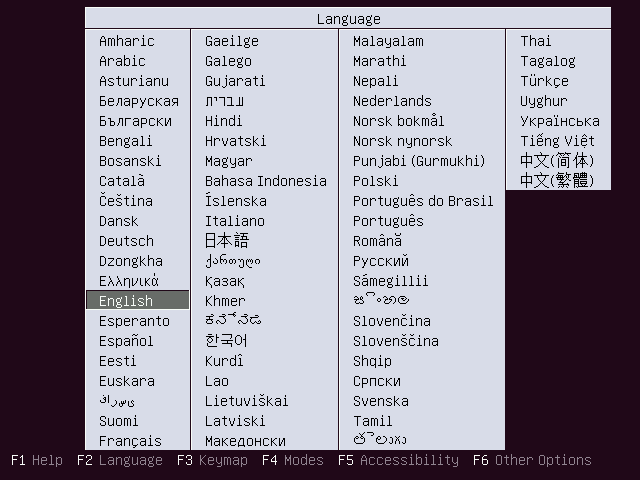
# You will be prompted to choose a language. Choose the appropriate language. | # You will be prompted to choose a language. Choose the appropriate language. | ||
#:[[File: | #:[[File:Screenshot01.png]] | ||
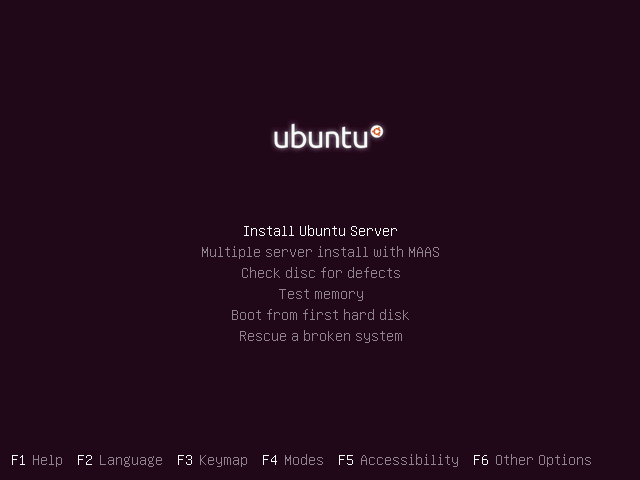
# Choose the option "Install Ubuntu Server" | # Choose the option "Install Ubuntu Server" | ||
#:[[File: | #:[[File:Screenshot02.png]] | ||
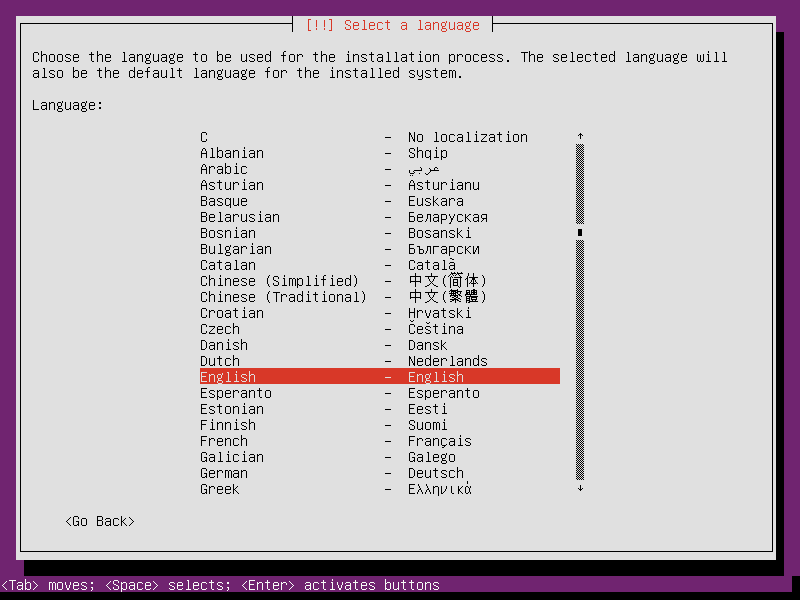
# Select your language once again. | # Select your language once again. | ||
#:[[File: | #:[[File:Screenshot03.png]] | ||
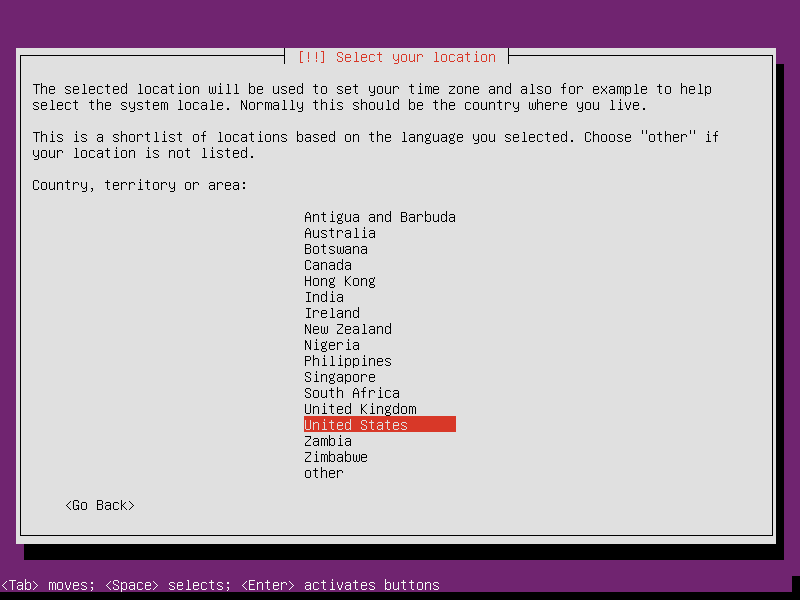
# Select your location. | # Select your location. | ||
#:[[File: | #:[[File:Screenshot04.png]] | ||
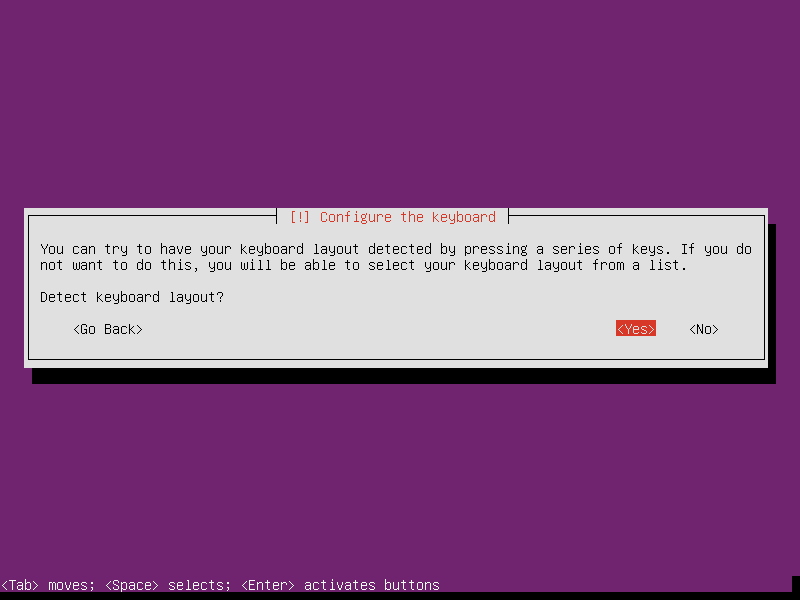
# Select your keyboard layout by allowing the installer to auto-detect it. | # Select your keyboard layout by allowing the installer to auto-detect it. | ||
#:[[File: | #:[[File:Screenshot05.png]] | ||
# At this point, your server will try to configure its network connection. Generally, the network will be configured automatically. If your network configuration fails, you will have to configure it manually. Speak to your network administrator or hosting company for the proper configuration values. | # At this point, your server will try to configure its network connection. Generally, the network will be configured automatically. If your network configuration fails, you will have to configure it manually. Speak to your network administrator or hosting company for the proper configuration values. | ||
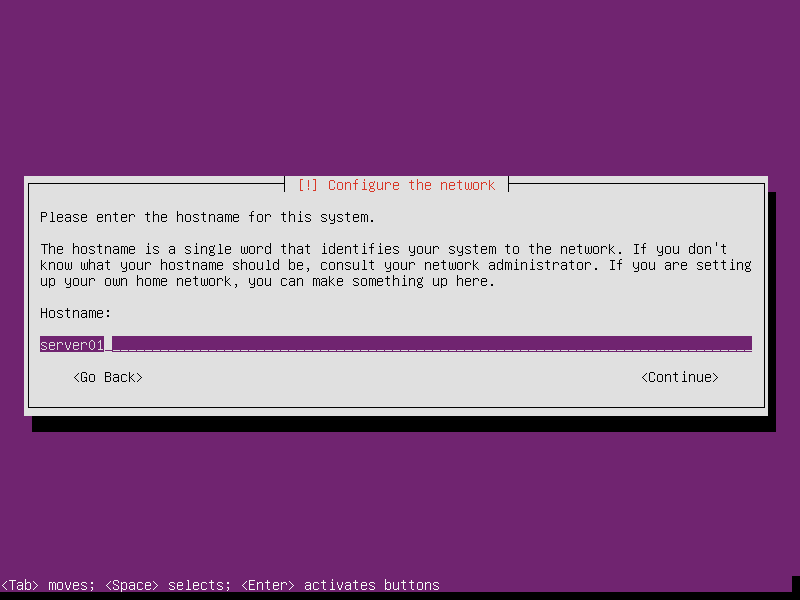
# Enter a hostname for this machine. If this machine already has a name on your network, use that. This does not include the domain name. For example, "server01" and not "server01.example.com". | # Enter a hostname for this machine. If this machine already has a name on your network, use that. This does not include the domain name. For example, "server01" and not "server01.example.com". | ||
#:[[File: | #:[[File:Screenshot06.png]] | ||
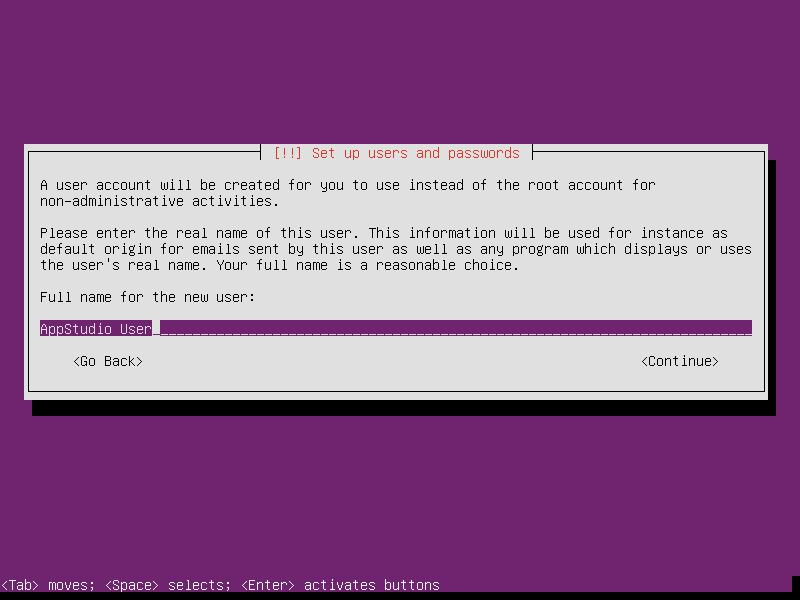
# Enter in the real name of the initial user. | # Enter in the real name of the initial user. | ||
#:[[File: | #:[[File:Screenshot07.png]] | ||
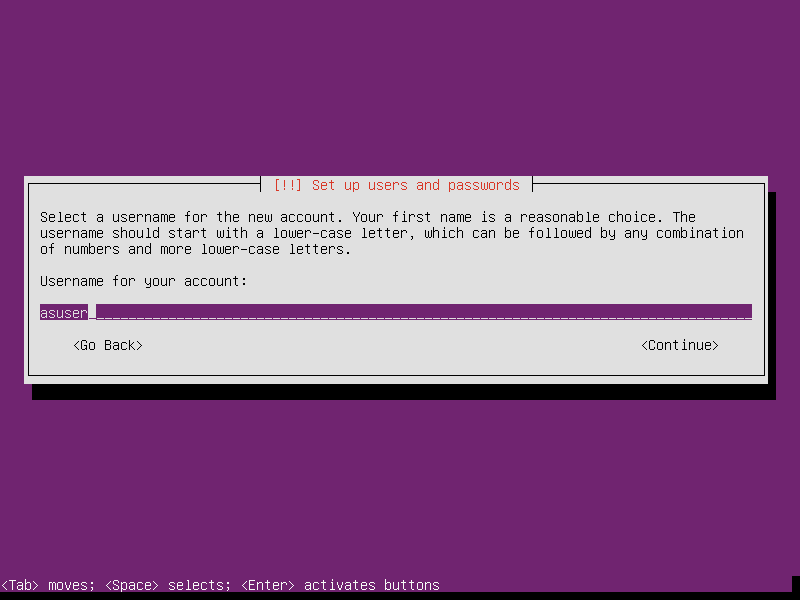
# Choose a name for the initial user. This user will have administrative privileges but will not be a super-user. | # Choose a name for the initial user. This user will have administrative privileges but will not be a super-user. | ||
#:[[File: | #:[[File:Screenshot08.png]] | ||
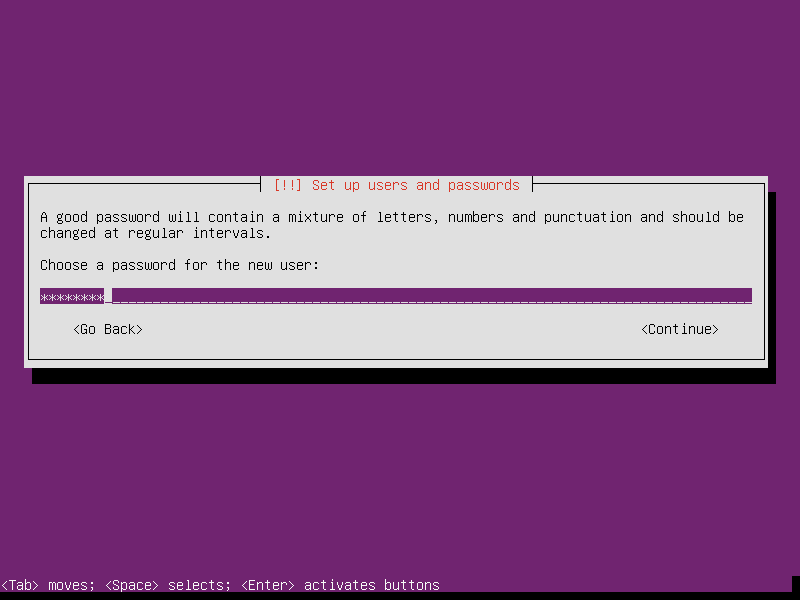
# Choose a password for the initial user. | # Choose a password for the initial user and verify it. | ||
#:[[File: | #:[[File:Screenshot09.png]] | ||
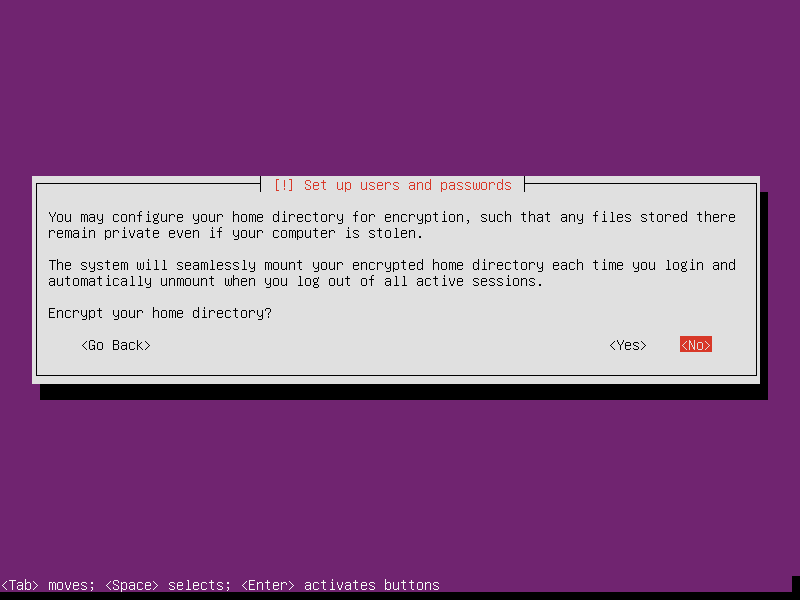
# Choose to not encrypt your home folder. | # Choose to not encrypt your home folder. | ||
#:[[File: | #:[[File:Screenshot10.png]] | ||
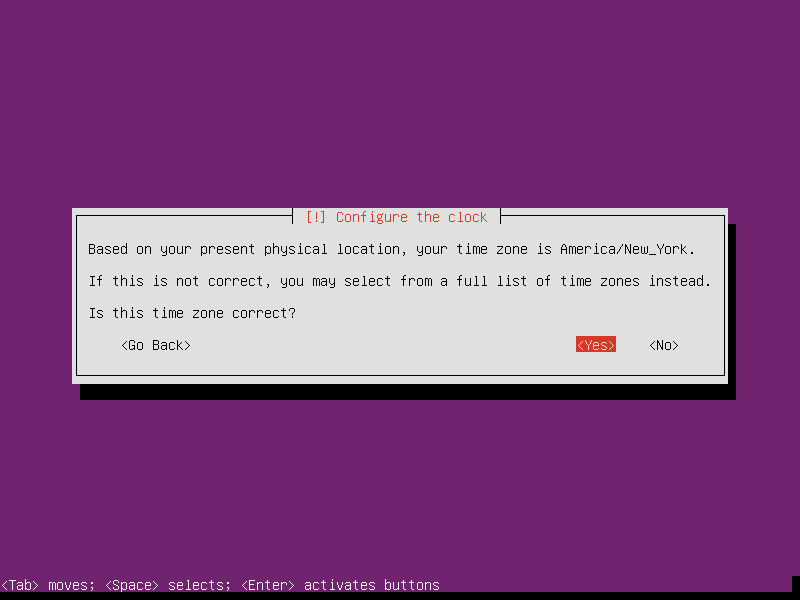
# Choose your timezone. | |||
#:[[File:Screenshot11.png]] | |||
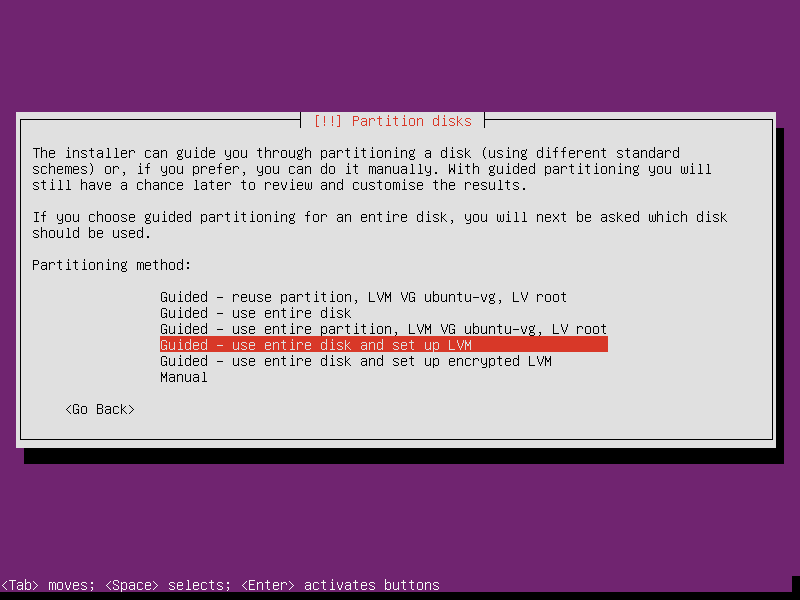
# Choose to use Guided Partitioning, using the entire disk, with LVM. | # Choose to use Guided Partitioning, using the entire disk, with LVM. | ||
#:[[File: | #:[[File:Screenshot12.png]] | ||
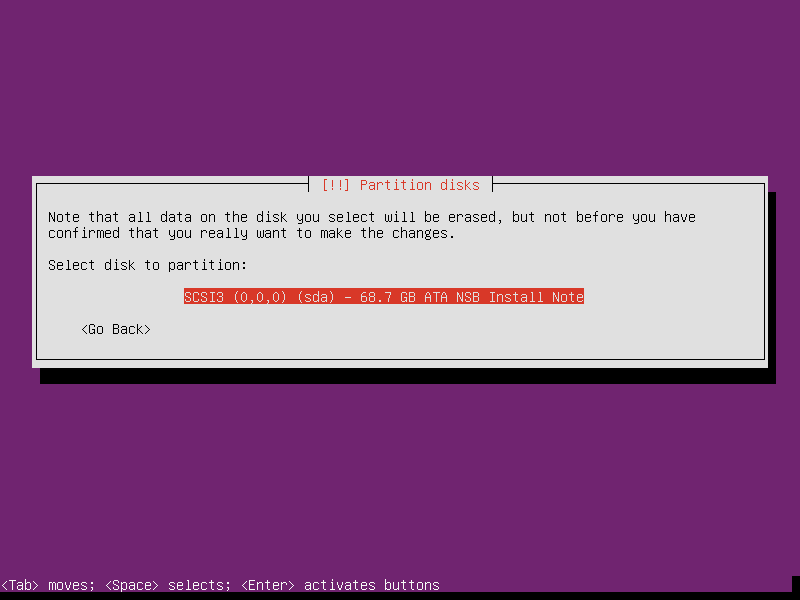
# Select the proper disk. | # Select the proper disk. | ||
#:[[File: | #:[[File:Screenshot13.png]] | ||
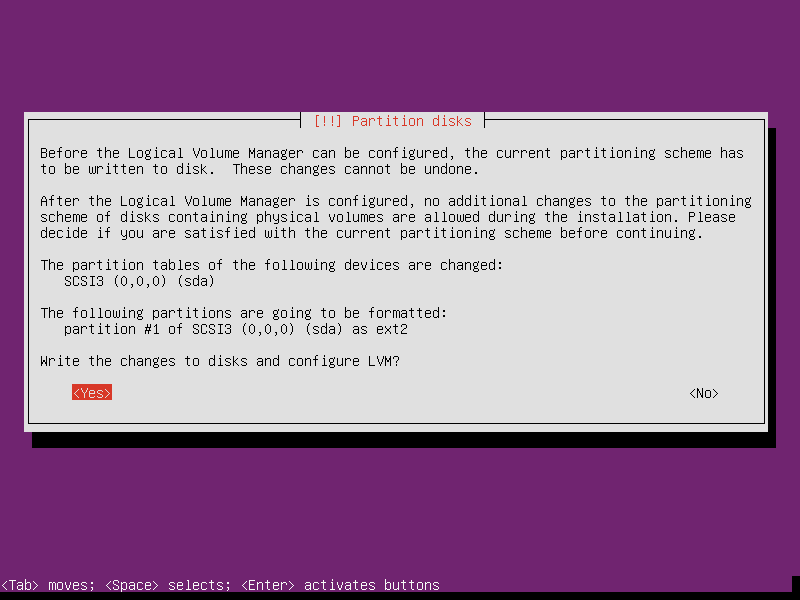
# Write the changes to disk. | # Write the changes to disk. | ||
#:[[File: | #:[[File:Screenshot14.png]] | ||
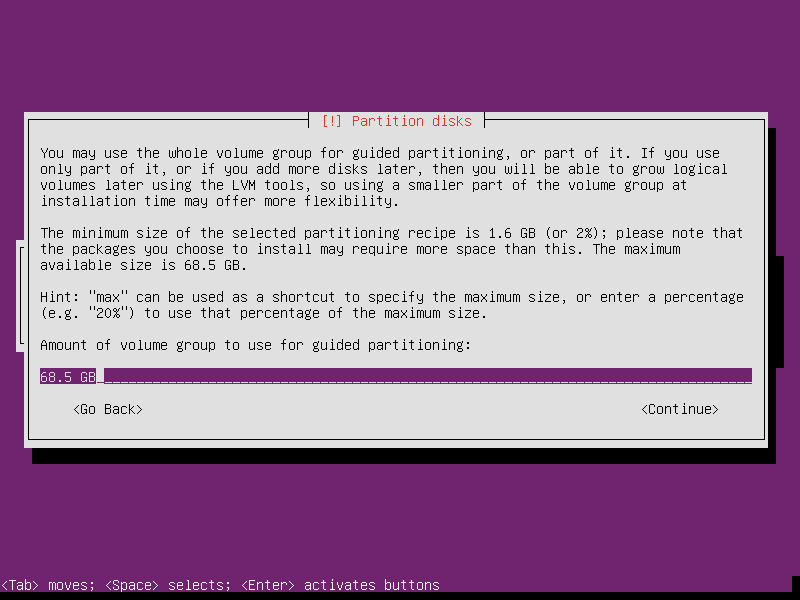
# Choose to use the entire disk again. | # Choose to use the entire disk again. | ||
#:[[File: | #:[[File:Screenshot15.png]] | ||
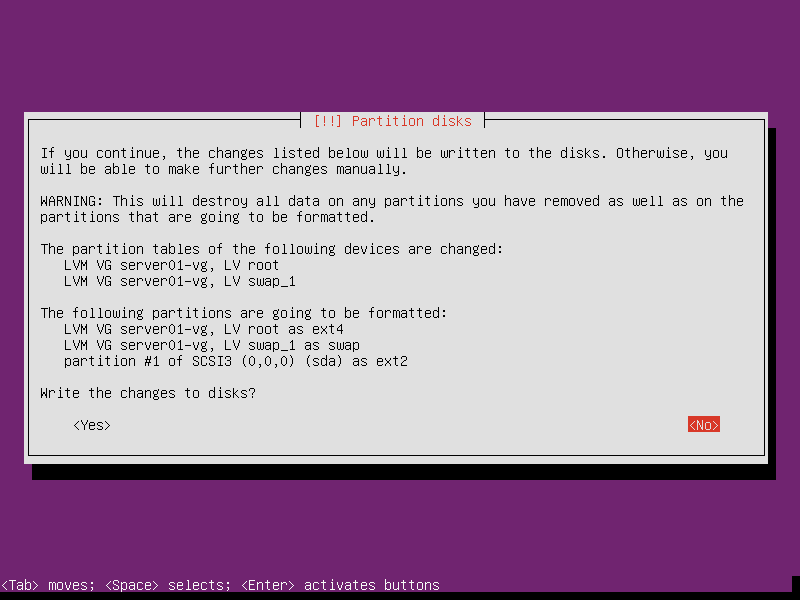
# Verify you will write changes to the disk again. The base system should now install. | # Verify you will write changes to the disk again. The base system should now install. | ||
#:[[File: | #:[[File:Screenshot16.png]] | ||
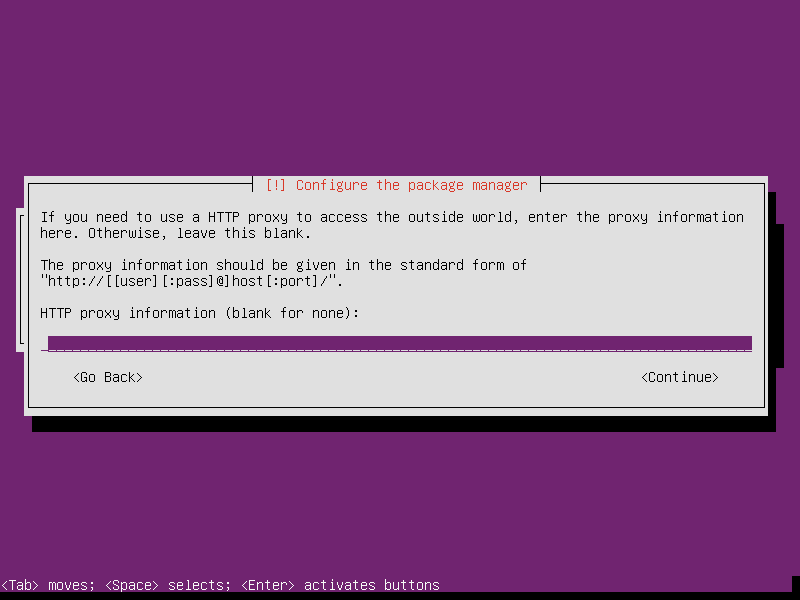
# Setup an HTTP proxy, if you need one. | # Setup an HTTP proxy, if you need one. | ||
#:[[File: | #:[[File:Screenshot17.png]] | ||
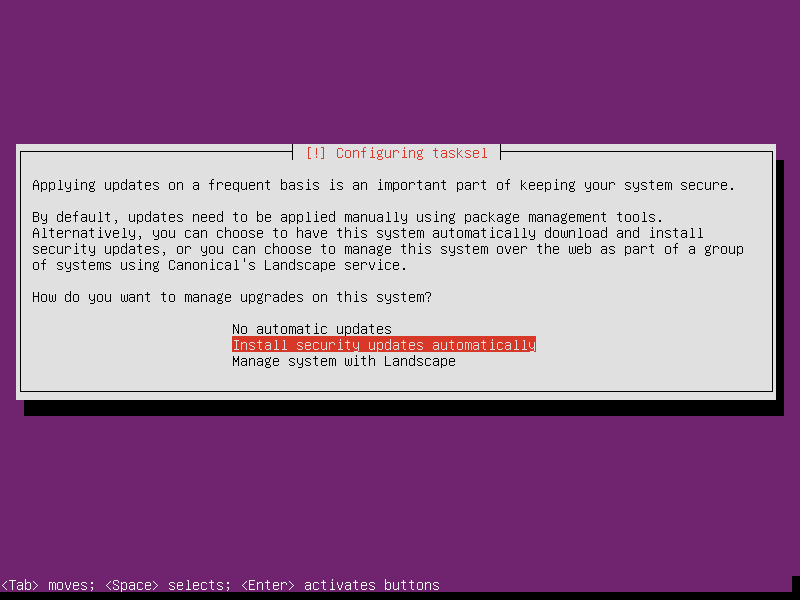
# Choose to install automatic updates. | # Choose to install automatic updates. | ||
#:[[File: | #:[[File:Screenshot18.png]] | ||
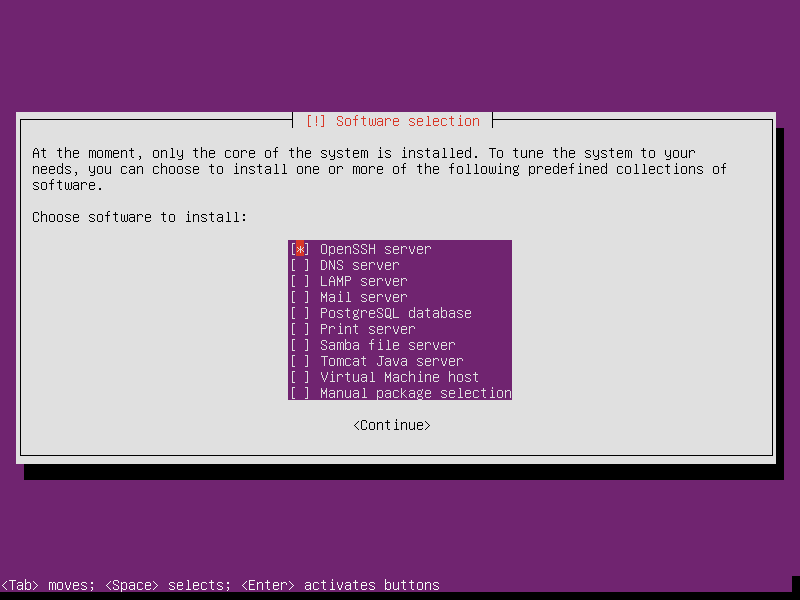
# Choose to install the OpenSSH server. | # Choose to install the OpenSSH server. | ||
#:[[File: | #:[[File:Screenshot19.png]] | ||
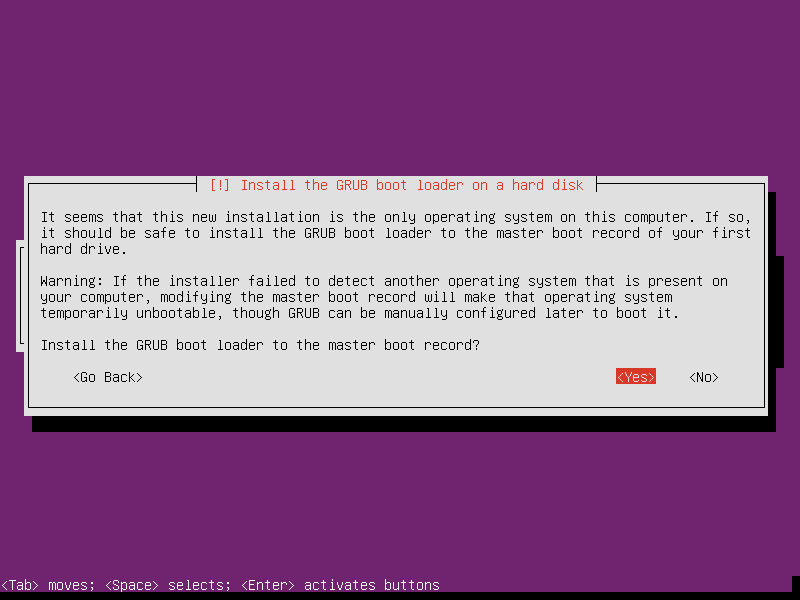
# Install GRUB to the master boot record. | # Install GRUB to the master boot record. | ||
#:[[File: | #:[[File:Screenshot20.png]] | ||
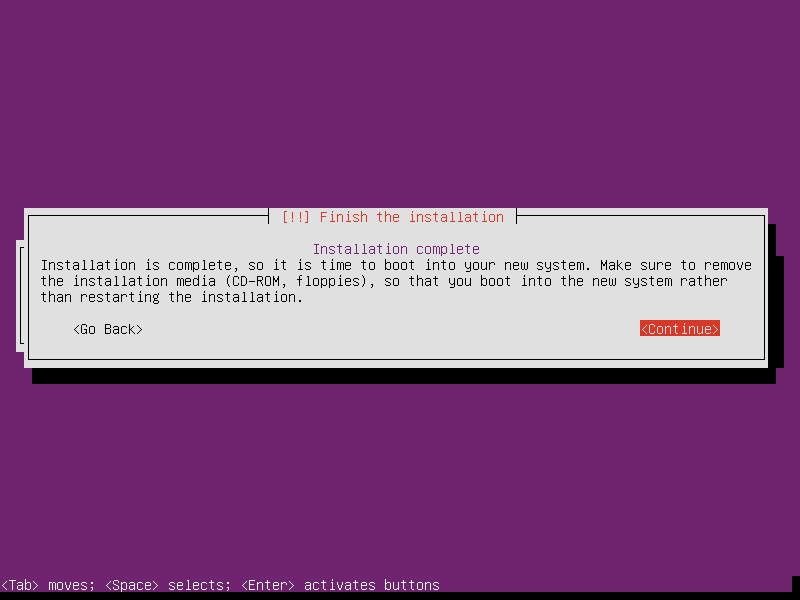
# Reboot. | # Reboot. | ||
#:[[File: | #:[[File:Screenshot21.png]] | ||
== Domain Names == | == Domain Names == | ||
| Line 90: | Line 92: | ||
</pre> | </pre> | ||
Replace "user" with the user you created while installing and "server01" with your server's hostname. | Replace "user" with the user you created while installing and "server01" with your server's hostname. When you first connect you will be prompted to verify you want to connect to the host. | ||
If you are on Windows, it's suggested you use PuTTY: http://www.chiark.greenend.org.uk/~sgtatham/putty/download.html. Documentation is available here: http://the.earth.li/~sgtatham/putty/0.63/htmldoc/Chapter2.html | If you are on Windows, it's suggested you use PuTTY: http://www.chiark.greenend.org.uk/~sgtatham/putty/download.html. Documentation is available here: http://the.earth.li/~sgtatham/putty/0.63/htmldoc/Chapter2.html | ||
If you can't login, there's a chance there's a problem with your network configuration. SSH uses port 22. Verify it's not being blocked by a firewall by speaking with your network administrator. | If you can't login, there's a chance there's a problem with your network configuration. SSH uses port 22. Verify it's not being blocked by a firewall by speaking with your network administrator. | ||
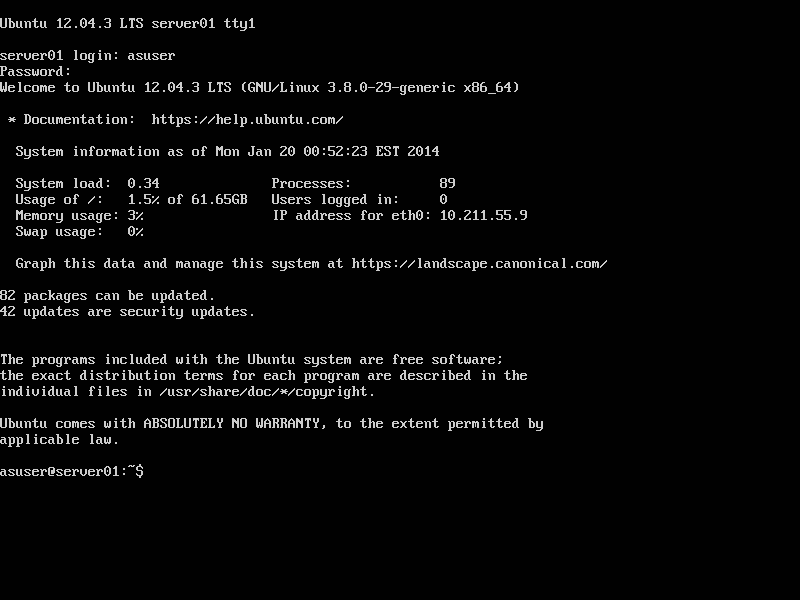
Upon logging in, you should see the following: | |||
[[File:Screenshot22.png]] | |||
== Configuring == | == Configuring == | ||
| Line 103: | Line 109: | ||
* https://help.ubuntu.com/community/CommandlineHowto | * https://help.ubuntu.com/community/CommandlineHowto | ||
* https://help.ubuntu.com/community/Beginners/BashScripting | * https://help.ubuntu.com/community/Beginners/BashScripting | ||
=== Using sudo === | |||
The "sudo" command allows you to run commands as a super user (Super User DO) without being a super user yourself. Because this guide is focused on administrative configuration of a server, many of the commands are proceeded by "sudo". | |||
When running a command prefixed by sudo, you will be prompted to enter your password. For the next 15 minutes, you will not have to enter your password. However, if you walk away from the computer and the screen blanks, or more than 15 minutes elapses, you will again have to enter your password. | |||
=== Update Packages === | === Update Packages === | ||
| Line 112: | Line 124: | ||
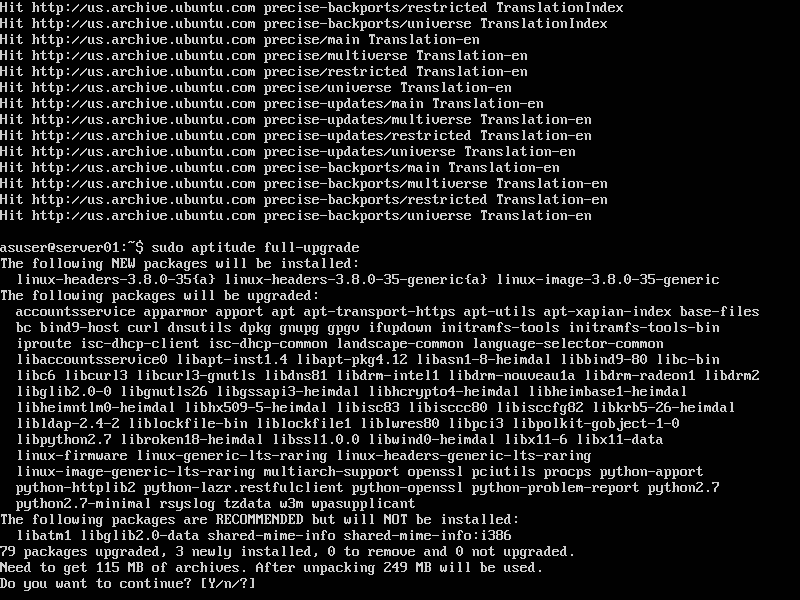
sudo aptitude full-upgrade | sudo aptitude full-upgrade | ||
</pre> | </pre> | ||
[[File:Screenshot23.png]] | |||
Follow the prompt, and after the upgrade is complete, install apache, vsftpd, and incron: | Follow the prompt, and after the upgrade is complete, install apache, vsftpd, and incron: | ||
| Line 166: | Line 180: | ||
</pre> | </pre> | ||
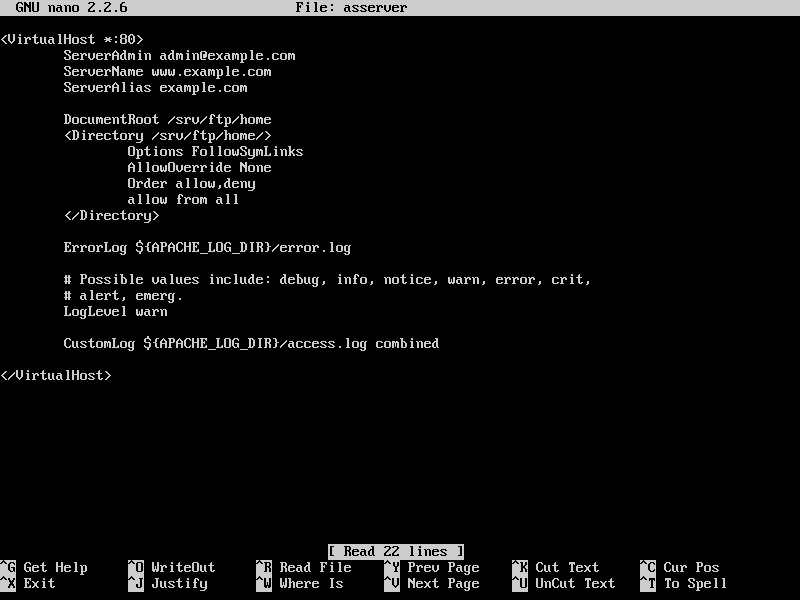
Save the file using Ctrl-O. Next, enable the site by making a symbolic link: | [[File:Screenshot24.png]] | ||
Save the file using Ctrl-O, verify the file name, and then exit with Ctrl-X. Next, enable the site by making a symbolic link: | |||
<pre> | <pre> | ||
| Line 189: | Line 205: | ||
Using nano, make the following modifications to /etc/vsftpd.conf: | Using nano, make the following modifications to /etc/vsftpd.conf: | ||
<pre> | |||
sudo nano /etc/vsftpd.conf | |||
</pre> | |||
* Uncomment <code>write_enable=YES</code> | * Uncomment <code>write_enable=YES</code> | ||
| Line 203: | Line 223: | ||
passwd_chroot_enable=YES | passwd_chroot_enable=YES | ||
</pre> | </pre> | ||
Save the file using Ctrl-O, verify the file name, and then exit with Ctrl-X. | |||
Add an FTP user to the system, and set its home folder to "/srv/ftp/./home": | Add an FTP user to the system, and set its home folder to "/srv/ftp/./home": | ||
| Line 210: | Line 232: | ||
sudo usermod -m -d /srv/ftp/./home ftpuser | sudo usermod -m -d /srv/ftp/./home ftpuser | ||
</pre> | </pre> | ||
[[File:Screenshot25.png]] | |||
Give ftpuser rights to /srv/ftp/home: | Give ftpuser rights to /srv/ftp/home: | ||
| Line 223: | Line 247: | ||
</pre> | </pre> | ||
Verify you can upload files by connecting via FTP as the user you just completed. They should appear in the web root. | Verify you can upload files by connecting via FTP as the user you just completed. They should appear in the web root. If you need an FTP client, WinSCP (http://winscp.net/eng/index.php) is a popular choice for Windows and Cyberduck (http://cyberduck.io/) is a popular choice for Mac OS. | ||
=== Creating the proper folder structure === | === Creating the proper folder structure === | ||
| Line 230: | Line 254: | ||
<pre> | <pre> | ||
sudo mkdir -p /srv/ftp/ | sudo mkdir -p /srv/ftp/NSB_UPLOAD_COMPLETED | ||
sudo mkdir -p /srv/ftp/templates | sudo mkdir -p /srv/ftp/templates | ||
sudo touch /srv/ftp/ | sudo touch /srv/ftp/NSB_UPLOAD_COMPLETED/.locked | ||
sudo chown ftpuser:ftpuser /srv/ftp/ | sudo chown ftpuser:ftpuser /srv/ftp/NSB_UPLOAD_COMPLETED | ||
</pre> | </pre> | ||
| Line 239: | Line 263: | ||
<pre> | <pre> | ||
sudo mkdir -p /srv/ftp/templates/3. | sudo mkdir -p /srv/ftp/templates/3.2.x | ||
</pre> | </pre> | ||
=== Uploading the " | === Uploading the "nsb" Folder === | ||
First, you will need to locate the " | First, you will need to locate the "nsb" folder, and upload it to your home folder. The directions vary by operating system. | ||
==== Windows ==== | ==== Windows ==== | ||
* Navigate using Windows Explorer to "C:\Program Files (x86)\NSB AppStudio\". On older systems, the folder may be "Program Files" without the "(x86)". | * Navigate using Windows Explorer to "C:\Program Files (x86)\NSB AppStudio\". On older systems, the folder may be "Program Files" without the "(x86)". | ||
* Copy the " | * Copy the "nsb" folder to your desktop. | ||
* Download and install an SFTP client, such as WinSCP: http://winscp.net/eng/index.php | * Download and install an SFTP client, such as WinSCP: http://winscp.net/eng/index.php | ||
* Connect to your server using the following instructions as a guide: http://winscp.net/eng/docs/guide_connect | * Connect to your server using the following instructions as a guide: http://winscp.net/eng/docs/guide_connect | ||
* WinSCP should default | * WinSCP should default its remote location to your home folder on the server. Upload the "nsb" folder on your desktop to your home folder using the following instructions as a guide: http://winscp.net/eng/docs/guide_upload | ||
==== Mac OS ==== | ==== Mac OS ==== | ||
| Line 260: | Line 284: | ||
* Choose "Show Package Contents" | * Choose "Show Package Contents" | ||
* In the Finder window that appears, navigate to "Contents/Resources". | * In the Finder window that appears, navigate to "Contents/Resources". | ||
* Copy the " | * Copy the "nsb" folder to your desktop. | ||
* Open the Terminal application in Mac OS, and type the following: | * Open the Terminal application in Mac OS, and type the following: | ||
<pre> | <pre> | ||
cd ~/Desktop | cd ~/Desktop | ||
scp -r | scp -r nsb user@server01:. | ||
</pre> | </pre> | ||
Be sure to replace "user" and "server01" with your username and server's hostname. | Be sure to replace "user" and "server01" with your username and server's hostname. | ||
==== Copying " | ==== Copying "nsb" to the Template Folder ==== | ||
Finally, copy the " | Finally, copy the "nsb" folder to the template folder you created. While logged into your server, type the following: | ||
<pre> | <pre> | ||
sudo cp -R ~/ | sudo cp -R ~/nsb /srv/ftp/templates/3.2.x/ | ||
</pre> | </pre> | ||
| Line 292: | Line 316: | ||
if grep --quiet '<meta name="generator" content="NSB/AppStudio 3.*" />' /srv/ftp/home/$1/index.html; then | if grep --quiet '<meta name="generator" content="NSB/AppStudio 3.*" />' /srv/ftp/home/$1/index.html; then | ||
ln -s /srv/ftp/templates/3. | ln -s /srv/ftp/templates/3.2.x/* /srv/ftp/home/$1 | ||
fi | fi | ||
# add elif lines for more templates | # add elif lines for more templates | ||
rm /srv/ftp/ | rm /srv/ftp/NSB_UPLOAD_COMPLETED/$1 | ||
</pre> | </pre> | ||
Save the file using Ctrl-O and | Save the file using Ctrl-O, verify the file name, and then exit with Ctrl-X. | ||
Mark it executable: | |||
<pre> | <pre> | ||
| Line 311: | Line 337: | ||
</pre> | </pre> | ||
Add the following content to the file and save with Ctrl-O: | Add the following content to the file and save with Ctrl-O, verify the file name, and then exit with Ctrl-X: | ||
<pre> | <pre> | ||
| Line 326: | Line 352: | ||
<pre> | <pre> | ||
/srv/ftp/ | /srv/ftp/NSB_UPLOAD_COMPLETED IN_CLOSE_WRITE /bin/bash /srv/ftp/templates/link.sh $# > /dev/null 2>&1 | ||
</pre> | </pre> | ||
Save the content with Ctrl-O. Incron should now be configured. You can verify this by creating a folder in /srv/ftp/home and then creating a file in /srv/ftp/ | Save the content with Ctrl-O. Incron should now be configured. You can verify this by creating a folder in /srv/ftp/home and then creating a file in /srv/ftp/NSB_UPLOAD_COMPLETED that shares the folder's name. The file you created should be removed and the folder should contain a link to your template. | ||
== Uploading & Verification == | == Uploading & Verification == | ||
| Line 341: | Line 367: | ||
# Choose a unique prefix for the folder based on the user's registration. | # Choose a unique prefix for the folder based on the user's registration. | ||
# Connect via FTP and upload the prefixed project folder into the ftp home folder. | # Connect via FTP and upload the prefixed project folder into the ftp home folder. | ||
# Change folders to ../ | # Change folders to ../NSB_UPLOAD_COMPLETED and drop a file in that folder that matches the name of the folder you just uploaded. | ||
You can follow these steps manually to test the system. | You can follow these steps manually to test the system. | ||
| Line 347: | Line 373: | ||
=== Verification === | === Verification === | ||
If the system is working properly, a symbolic link to the template should have appeared in your project's folder after uploadng. Also, the file uploaded to | If the system is working properly, a symbolic link to the template should have appeared in your project's folder after uploadng. Also, the file uploaded to NSB_UPLOAD_COMPLETE should have been removed. | ||
It's important to note, that if the uploaded project does not contain "index.html" or the included "index.html" file does not contain a proper generator string (e.g. <code><meta name="generator" content="NSB/AppStudio 3</code>...) the template files will not be linked. Also, if the template files already exist in the upload, they will not be replaced by a link. | |||
=== Verification with AppStudio === | |||
You cannot verify the complete functionality of the server with AppStudio. You can, however, test he FTP and HTTP components of the server by configuring AppStudio to upload to your server directly: | |||
* Go into AppStudio's Preferences: | |||
** Windows: This will be in the Tools menu. | |||
** Mac OS: This will be in the AppStudio menu. | |||
* Change the Deployment Location to "Deploy to server listed below". You will only be able to perform this step if you have a registered copy. | |||
* Set the server to the hostname or IP address of the server you've just configured | |||
* Set the username to the name of your ftp user. | |||
* Set the password to the password of your ftp user. | |||
* Click OK. | |||
[[File:Screenshot_2014-02-03_20.17.14.png]] | |||
Now, when you deploy your application, you should be able to access it at: http://[servername]/[projectname]/ | |||
Latest revision as of 07:27, 9 February 2014
Front Matter
The following instructions will walk you through installing and configuring an AppStudio Test Server. They assume you have a basic understanding of how to use computers, but no prior knowledge otherwise. You will be installing Ubuntu Server, which is a Linux distribution. You should have physical access to the server you are installing on, though it is possible to install to a virtual server that you can remote into. These instructions will not work for a shared hosting environment, that is, an environment where you do not have root access (otherwise known as administrative or super user access) to the server.
Determining the CPU Type
The following instructions assume you are installing on a 64-bit machine. You can determine if your machine is 64-bit capable by looking up your CPU by model number. You can generally find the CPU type in the BIOS Setup, which is normally accessed on boot by pressing a function key or the delete key. Intel CPU model numbers tend to look like a letter and 4 numbers, for instance: T7600. Once you have the CPU model, you can verify it has a 64-bit instruction set by looking up the CPU on Intel's site. For instance:
- 64-bit CPU: http://ark.intel.com/products/27257/intel-core2-duo-processor-t7600-4m-cache-2_33-ghz-667-mhz-fsb
- 32-bit CPU: http://ark.intel.com/products/27235/Intel-Core-Duo-Processor-T2400-2M-Cache-1_83-ghz-667-mhz-fsb
Most modern CPUs are 64-bit.
These instructions have not been tested on a 32-bit machine. However, they should work with minimum changes. If you are planning to install on a 32-bit machine, you should download the x86 image: http://releases.ubuntu.com/precise/ubuntu-12.04.4-server-i386.iso
Create Bootable Media
- Download Ubuntu Server 12.04.4 LTS 64-bit: http://releases.ubuntu.com/precise/ubuntu-12.04.4-server-amd64.iso
- Determine if you will be writing the ISO file to a CD or a USB drive.
- CD: simply write the ISO image to a writable CD. Detailed instructions are available here for many operating systems: https://help.ubuntu.com/community/BurningIsoHowto
- USB drive: writing to a USB drive can be a bit tricky. It's suggested that you use Linux Live USB Creator on Windows (http://www.linuxliveusb.com/en/home). Detailed instructions (and instructions for other OSes) can be found here: https://help.ubuntu.com/community/Installation/FromUSBStick
Install Ubuntu
This section assumes you have physical access to the machine. Generally, a virtual server host will automate this step.
More detailed install instructions can be found here: https://help.ubuntu.com/lts/serverguide/installing-from-cd.html
- Boot your Ubuntu media. This may require you to either hold down a key during boot or change the boot device order in the BIOS settings. Instructions vary depending on your model of server.
- You will be prompted to choose a language. Choose the appropriate language.
- Choose the option "Install Ubuntu Server"
- Select your language once again.
- Select your location.
- Select your keyboard layout by allowing the installer to auto-detect it.
- At this point, your server will try to configure its network connection. Generally, the network will be configured automatically. If your network configuration fails, you will have to configure it manually. Speak to your network administrator or hosting company for the proper configuration values.
- Enter a hostname for this machine. If this machine already has a name on your network, use that. This does not include the domain name. For example, "server01" and not "server01.example.com".
- Enter in the real name of the initial user.
- Choose a name for the initial user. This user will have administrative privileges but will not be a super-user.
- Choose a password for the initial user and verify it.
- Choose to not encrypt your home folder.
- Choose your timezone.
- Choose to use Guided Partitioning, using the entire disk, with LVM.
- Select the proper disk.
- Write the changes to disk.
- Choose to use the entire disk again.
- Verify you will write changes to the disk again. The base system should now install.
- Setup an HTTP proxy, if you need one.
- Choose to install automatic updates.
- Choose to install the OpenSSH server.
- Install GRUB to the master boot record.
- Reboot.
Domain Names
The remainder of these instructions assume you have a host and domain name configured externally for the server. A domain name server maps the server's IP address to a name, for instance 10.1.1.2 to server01 (or server01.example.com if the domain name is "fully qualified"). If you don't have an external domain name server, some of the following instructions will not work. You can either speak with your network administrator to get a DNS (domain name server) entry created, or you can modify the "hosts" file of the computer from which you will be configuring the server. The following link describes how to modify your "hosts" file on Windows, Mac OS, and Linux: http://www.rackspace.com/knowledge_center/article/how-do-i-modify-my-hosts-file
Add the following entry into the "hosts" file:
10.1.1.2 server01
Replace 10.1.1.2 with the IP address of your server and "server01" with the host name of your server.
Remote Access
At this point, you should be able to login to your server using SSH. SSH stands for secure shell. It allows you to bring up a command prompt from another machine. If you are on Mac OS or Linux, you can open a Terminal and type:
ssh user@server01
Replace "user" with the user you created while installing and "server01" with your server's hostname. When you first connect you will be prompted to verify you want to connect to the host.
If you are on Windows, it's suggested you use PuTTY: http://www.chiark.greenend.org.uk/~sgtatham/putty/download.html. Documentation is available here: http://the.earth.li/~sgtatham/putty/0.63/htmldoc/Chapter2.html
If you can't login, there's a chance there's a problem with your network configuration. SSH uses port 22. Verify it's not being blocked by a firewall by speaking with your network administrator.
Upon logging in, you should see the following:
Configuring
Once your computer has rebooted, login using the username and password you created during the install process. The remainder of this tutorial assumes a basic familiarity with Bash, navigating folder structures from the command prompt in Unix based environments (Linux, Mac OS, etc...), editing text files, and scripting. If you aren't comfortable with these topics, here are several tutorials that may help:
- https://help.ubuntu.com/community/UsingTheTerminal
- https://help.ubuntu.com/community/CommandlineHowto
- https://help.ubuntu.com/community/Beginners/BashScripting
Using sudo
The "sudo" command allows you to run commands as a super user (Super User DO) without being a super user yourself. Because this guide is focused on administrative configuration of a server, many of the commands are proceeded by "sudo".
When running a command prefixed by sudo, you will be prompted to enter your password. For the next 15 minutes, you will not have to enter your password. However, if you walk away from the computer and the screen blanks, or more than 15 minutes elapses, you will again have to enter your password.
Update Packages
At the command prompt, type the following:
sudo aptitude update
sudo aptitude full-upgrade
Follow the prompt, and after the upgrade is complete, install apache, vsftpd, and incron:
sudo aptitude install apache2 vsftpd incron
Finally, reboot:
sudo reboot
Configure Apache
From the command prompt, switch to the following folder:
cd /etc/apache2/sites-available
Create a new site by creating a new text file:
sudo nano asserver
Paste the following content into the file, changing the ServerAdmin, ServerName, and ServerAlias to values that make sense for your server:
<VirtualHost *:80>
        ServerAdmin admin@example.com
        ServerName www.example.com
        ServerAlias example.com

        DocumentRoot /srv/ftp/home
        <Directory /srv/ftp/home/>
                Options FollowSymLinks
                AllowOverride None
                Order allow,deny
                allow from all
        </Directory>

        ErrorLog ${APACHE_LOG_DIR}/error.log

        # Possible values include: debug, info, notice, warn, error, crit,
        # alert, emerg.
        LogLevel warn

        CustomLog ${APACHE_LOG_DIR}/access.log combined

</VirtualHost>
Save the file using Ctrl-O, verify the file name, and then exit with Ctrl-X. Next, enable the site by making a symbolic link:
sudo ln -s ../sites-available/asserver ../sites-enabled/asserver
Next, make the document root specified above:
sudo mkdir -p /srv/ftp/home
Finally, restart apache:
sudo /etc/init.d/apache2 restart
Verify that you receive a forbidden error when navigating to your server in a web browser. If you place an html file in your web root, you should be able to navigate to that as a further test.
Configuring VSFTPD
Using nano, make the following modifications to /etc/vsftpd.conf:
sudo nano /etc/vsftpd.conf
- Uncomment
write_enable=YES - Change
anonymous_enable=YEStoanonymous_enable=NO - Uncomment
local_enable=YES - Uncomment
local_umask=022 - Add the following lines:
delete_failed_uploads=YES
pasv_min_port=50000
pasv_max_port=50100
port_enable=NO
chroot_local_user=YES
passwd_chroot_enable=YES
Save the file using Ctrl-O, verify the file name, and then exit with Ctrl-X.
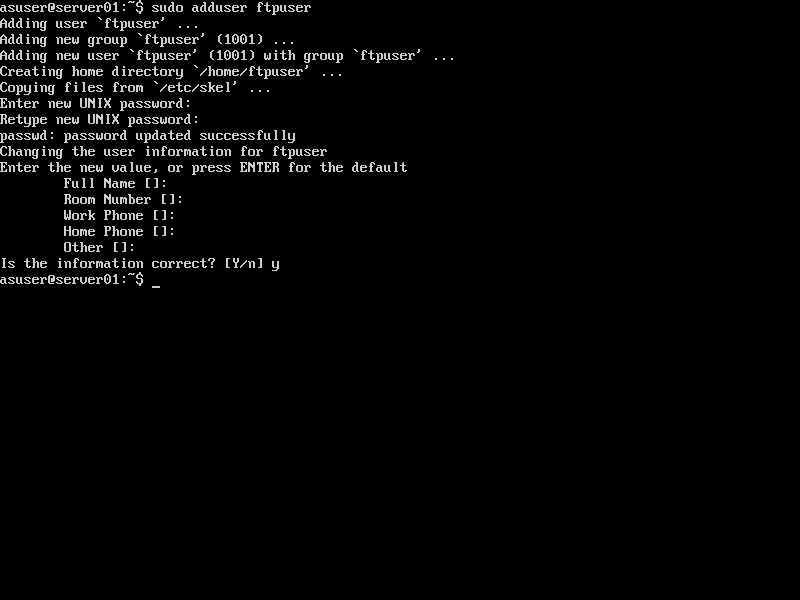
Add an FTP user to the system, and set its home folder to "/srv/ftp/./home":
sudo adduser ftpuser
sudo usermod -m -d /srv/ftp/./home ftpuser
Give ftpuser rights to /srv/ftp/home:
sudo chown ftpuser:ftpuser /srv/ftp/home
Restart vsftpd:
sudo /etc/init.d/vsftpd restart
Verify you can upload files by connecting via FTP as the user you just completed. They should appear in the web root. If you need an FTP client, WinSCP (http://winscp.net/eng/index.php) is a popular choice for Windows and Cyberduck (http://cyberduck.io/) is a popular choice for Mac OS.
Creating the proper folder structure
Start by creating the folders to support template uploads and setting their permissions:
sudo mkdir -p /srv/ftp/NSB_UPLOAD_COMPLETED
sudo mkdir -p /srv/ftp/templates
sudo touch /srv/ftp/NSB_UPLOAD_COMPLETED/.locked
sudo chown ftpuser:ftpuser /srv/ftp/NSB_UPLOAD_COMPLETED
Make template folders for all the versions of AppStudio you wish to support - for instance:
sudo mkdir -p /srv/ftp/templates/3.2.x
Uploading the "nsb" Folder
First, you will need to locate the "nsb" folder, and upload it to your home folder. The directions vary by operating system.
Windows
- Navigate using Windows Explorer to "C:\Program Files (x86)\NSB AppStudio\". On older systems, the folder may be "Program Files" without the "(x86)".
- Copy the "nsb" folder to your desktop.
- Download and install an SFTP client, such as WinSCP: http://winscp.net/eng/index.php
- Connect to your server using the following instructions as a guide: http://winscp.net/eng/docs/guide_connect
- WinSCP should default its remote location to your home folder on the server. Upload the "nsb" folder on your desktop to your home folder using the following instructions as a guide: http://winscp.net/eng/docs/guide_upload
Mac OS
- Navigate to the "Applications" folder on "Macintosh HD".
- Find the AppStudio icon and right click on it.
- Choose "Show Package Contents"
- In the Finder window that appears, navigate to "Contents/Resources".
- Copy the "nsb" folder to your desktop.
- Open the Terminal application in Mac OS, and type the following:
cd ~/Desktop
scp -r nsb user@server01:.
Be sure to replace "user" and "server01" with your username and server's hostname.
Copying "nsb" to the Template Folder
Finally, copy the "nsb" folder to the template folder you created. While logged into your server, type the following:
sudo cp -R ~/nsb /srv/ftp/templates/3.2.x/
Configuring incron
First, create the link script in the template folder with the following command:
sudo nano /srv/ftp/templates/link.sh
Copy the following into link.sh using nano:
#!/bin/bash

if grep --quiet '<meta name="generator" content="NSB/AppStudio 3.*" />' /srv/ftp/home/$1/index.html; then
    ln -s /srv/ftp/templates/3.2.x/* /srv/ftp/home/$1
fi
# add elif lines for more templates

rm /srv/ftp/NSB_UPLOAD_COMPLETED/$1
Save the file using Ctrl-O, verify the file name, and then exit with Ctrl-X.
Mark it executable:
sudo chmod a+x /srv/ftp/templates/link.sh
Next you need to configure incron for ftpuser. First allow ftpuser to use incron by creating the following file:
sudo nano /etc/incron.allow
Add the following content to the file and save with Ctrl-O, verify the file name, and then exit with Ctrl-X:
ftpuser
Edit ftpuser's incrontab:
sudo incrontab -u ftpuser -e
This brings up an editor. Paste the following content into the editor:
/srv/ftp/NSB_UPLOAD_COMPLETED IN_CLOSE_WRITE /bin/bash /srv/ftp/templates/link.sh $# > /dev/null 2>&1
Save the content with Ctrl-O. Incron should now be configured. You can verify this by creating a folder in /srv/ftp/home and then creating a file in /srv/ftp/NSB_UPLOAD_COMPLETED that shares the folder's name. The file you created should be removed and the folder should contain a link to your template.
Uploading & Verification
If everything has been configured correctly, you should be able to connect via FTP upload files using AppStudio's protocol, described below.
AppStudio Upload Protocol
AppStudio uploads projects to a test server with the following steps:
- Choose a unique prefix for the folder based on the user's registration.
- Connect via FTP and upload the prefixed project folder into the ftp home folder.
- Change folders to ../NSB_UPLOAD_COMPLETED and drop a file in that folder that matches the name of the folder you just uploaded.
You can follow these steps manually to test the system.
Verification
If the system is working properly, a symbolic link to the template should have appeared in your project's folder after uploadng. Also, the file uploaded to NSB_UPLOAD_COMPLETE should have been removed.
It's important to note, that if the uploaded project does not contain "index.html" or the included "index.html" file does not contain a proper generator string (e.g. <meta name="generator" content="NSB/AppStudio 3...) the template files will not be linked. Also, if the template files already exist in the upload, they will not be replaced by a link.
Verification with AppStudio
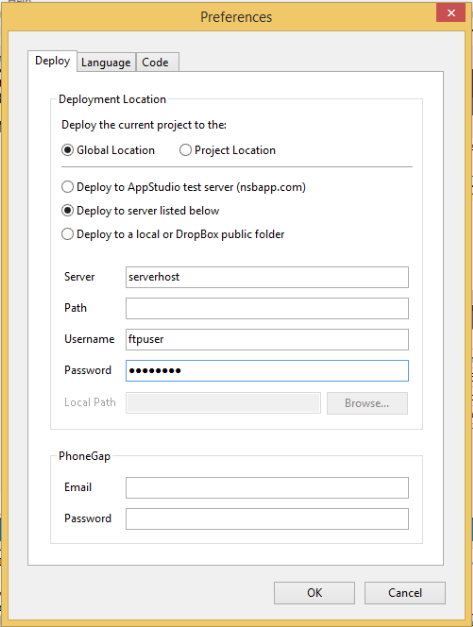
You cannot verify the complete functionality of the server with AppStudio. You can, however, test he FTP and HTTP components of the server by configuring AppStudio to upload to your server directly:
- Go into AppStudio's Preferences:
- Windows: This will be in the Tools menu.
- Mac OS: This will be in the AppStudio menu.
- Change the Deployment Location to "Deploy to server listed below". You will only be able to perform this step if you have a registered copy.
- Set the server to the hostname or IP address of the server you've just configured
- Set the username to the name of your ftp user.
- Set the password to the password of your ftp user.
- Click OK.
Now, when you deploy your application, you should be able to access it at: http://[servername]/[projectname]/
