Google Drive API: Difference between revisions
No edit summary |
No edit summary |
||
| (33 intermediate revisions by the same user not shown) | |||
| Line 1: | Line 1: | ||
== Overview == | |||
Google Drive lets you store spreadsheets, documents, slides and other documents in the cloud. The files can be access by any desktop or mobile computer with the appropriate sign on credentials. | |||
If you are working on the desktop in a browser, your regular logon will let you access the files. You can also do so from the browser on your device. | |||
Where it gets exciting is that you can read and write the files from within your AppStudio app. For example, you could use a Google Drive Spreadsheet as a database, which would be accessible from both the desktop and your app. If your device is offline, the changes will be made next time it has a chance to sync. | |||
== Basic Requirements == | |||
1. Apps must run from a server, either VoltServer or your own. They cannot be run locally on your desktop. | |||
2. Security, as you should expect, is good. You can only access files in Google Drive if you have a Google Client ID and your server is registered to that ID. See "Setting up your Credentials". | |||
== Add GoogleDrive Library to your project == | |||
1. In the Project Explorer, select "Project Properties and Global Code". | |||
2. In the Libraries panel which appears, select "Google Drive". | |||
AppStudio should look like this: | |||
[[File:Googledrivelibrary.png]] | |||
Three files will be included in your project: | |||
# GoogleDrive.js: a set of functions to make it easier to call the Google API from AppStudio. | |||
# client.js: a library from Google to call the Google API. | |||
# papaparse.min.js: a library which parses csv files like Google Sheets. From [http://papaparse.com/ PapaParse]. | |||
== Setting up your Credentials == | |||
Note: Google is constantly fiddling with the UI for this. These instructions are meant only as a guideline. Check Google's documentation for changes. | |||
1. Set up new project in the [https://console.developers.google.com/ Google API Console]. | 1. Set up new project in the [https://console.developers.google.com/ Google API Console]. | ||
2. In | 2. In Dashboard, enable Drive API | ||
3. Go to Credentials | 3. Go to Credentials, click on "Create credentials", then "Help me choose". | ||
4. You'll see the question "Where will you be calling the API from?" | 4. You'll see the question "Where will you be calling the API from?" | ||
Answer with "Web Browser (javascript)" | Answer with "Web Browser (javascript)" | ||
"What data will you be accessing?" | For "What data will you be accessing?", enter "User Data". | ||
"User Data" | |||
5. Click on "What credentials do I need?" | 5. Click on "What credentials do I need?" | ||
6. For "Authorized JavaScript origins:", | 6. For "Authorized JavaScript origins:", enter the name of your server. For a VoltServer app, something like this: https://googlespreadsheet-signs-smoothly.volt.live | ||
enter the name of your server, | |||
7. Click on Create client ID | 7. Click on Create client ID. | ||
8. | 8. Set up the consent screen by entering in a 'Product name' and clicking on 'Continue'. | ||
9. | 9. It will now show your Client ID. Save that. | ||
10. | 10. Go back to Credentials and choose "Create credentials" again. This time, choose the "API key" option. | ||
11. | 11. It will display your API key. Save that. | ||
12. Your credentials screen should now look like this: | 12. Your credentials screen should now look like this: | ||
[[File:Credentials.png]] | |||
304468290387-xxxxxxxxxxxxxxxxxxxxxxxxxxxxxxxx.apps.googleusercontent.com | |||
== Add your credentials to your app == | |||
Copy credentials: Client ID. It will look something like | |||
304468290387-xxxxxxxxxxxxxxxxxxxxxxxxxxxxxxxx.apps.googleusercontent.com. | |||
Copy this into the CLIENT_ID variable in your Google Drive App. | Copy this into the CLIENT_ID variable in your Google Drive App. | ||
<pre> | |||
GoogleDrive.CLIENT_ID = "988...apps.googleusercontent.com" | |||
</pre> | |||
== Get the File ID of your spreadsheet == | |||
1. Run the GoogleDriveAPI app. A permission screen should display, based on the credentials you entered. Click on "Allow". | |||
2. If the Authorize button is enabled, click on it. You are now able to access the Google Drive API. | |||
== Getting the list of files on your Google Drive == | |||
1. Click on "List Files". The files on your Google Drive will appear, along with their File IDs. | |||
[[File:GoogleDriveSpreadsheets.png]] | [[File:GoogleDriveSpreadsheets.png]] | ||
2. Get the FILE_ID for your spreadsheet from the File_Id column. Put that in the top of the app: it is hardcoded in the sample. You're welcome to use better ways to select the FILE_ID in your own app. | |||
== Reading and Writing Spreadsheets == | |||
=== Reading === | |||
Restart the app and click on Get Spreadsheet. The contents of the spreadsheet will appear. | |||
The code to do this is | |||
<pre> | |||
btnGet.onclick = function() { | |||
GoogleDrive.getSpreadsheet(FILE_ID, getSpreadsheetCallback); | |||
} | |||
function getSpreadsheetCallback(results) { | |||
spreadsheet = results; | |||
console.table(results); | |||
} | |||
</pre> | |||
Notice that the getSpreadsheet call has a callback function. It may take a few seconds to get the spreadsheet: the callback function is called with the results when they are available. | |||
Here is what shows in the Chrome Console: | |||
[[File:Spreadsheet.png]] | |||
=== Updating === | |||
You can now modify the spreadsheet in your code. The spreadsheet is stored as 2d array. Here's how to reference it: | |||
<pre> | |||
spreadsheet[0][0] - the top left corner | |||
spreadsheet[0][1] - the top item in second column. | |||
spreadsheet[1][1] = "B2" - Set the value of row 2, col 2 to "B2" | |||
</pre> | |||
=== Saving === | |||
To write your spreadsheet out, use the saveSpreadsheet function: | |||
<pre> | |||
btnSave.onclick = function() { | |||
GoogleDrive.saveSpreadsheet(spreadsheet, FILE_ID, saveSpreadsheetCallback); | |||
} | |||
function saveSpreadsheetCallback() { | |||
alert("done"); | |||
} | |||
</pre> | |||
Once again, there is a callback function once the save is complete. | |||
Latest revision as of 15:33, 25 February 2021
Overview
Google Drive lets you store spreadsheets, documents, slides and other documents in the cloud. The files can be access by any desktop or mobile computer with the appropriate sign on credentials.
If you are working on the desktop in a browser, your regular logon will let you access the files. You can also do so from the browser on your device.
Where it gets exciting is that you can read and write the files from within your AppStudio app. For example, you could use a Google Drive Spreadsheet as a database, which would be accessible from both the desktop and your app. If your device is offline, the changes will be made next time it has a chance to sync.
Basic Requirements
1. Apps must run from a server, either VoltServer or your own. They cannot be run locally on your desktop.
2. Security, as you should expect, is good. You can only access files in Google Drive if you have a Google Client ID and your server is registered to that ID. See "Setting up your Credentials".
Add GoogleDrive Library to your project
1. In the Project Explorer, select "Project Properties and Global Code".
2. In the Libraries panel which appears, select "Google Drive".
AppStudio should look like this:
Three files will be included in your project:
- GoogleDrive.js: a set of functions to make it easier to call the Google API from AppStudio.
- client.js: a library from Google to call the Google API.
- papaparse.min.js: a library which parses csv files like Google Sheets. From PapaParse.
Setting up your Credentials
Note: Google is constantly fiddling with the UI for this. These instructions are meant only as a guideline. Check Google's documentation for changes.
1. Set up new project in the Google API Console.
2. In Dashboard, enable Drive API
3. Go to Credentials, click on "Create credentials", then "Help me choose".
4. You'll see the question "Where will you be calling the API from?" Answer with "Web Browser (javascript)"
For "What data will you be accessing?", enter "User Data".
5. Click on "What credentials do I need?"
6. For "Authorized JavaScript origins:", enter the name of your server. For a VoltServer app, something like this: https://googlespreadsheet-signs-smoothly.volt.live
7. Click on Create client ID.
8. Set up the consent screen by entering in a 'Product name' and clicking on 'Continue'.
9. It will now show your Client ID. Save that.
10. Go back to Credentials and choose "Create credentials" again. This time, choose the "API key" option.
11. It will display your API key. Save that.
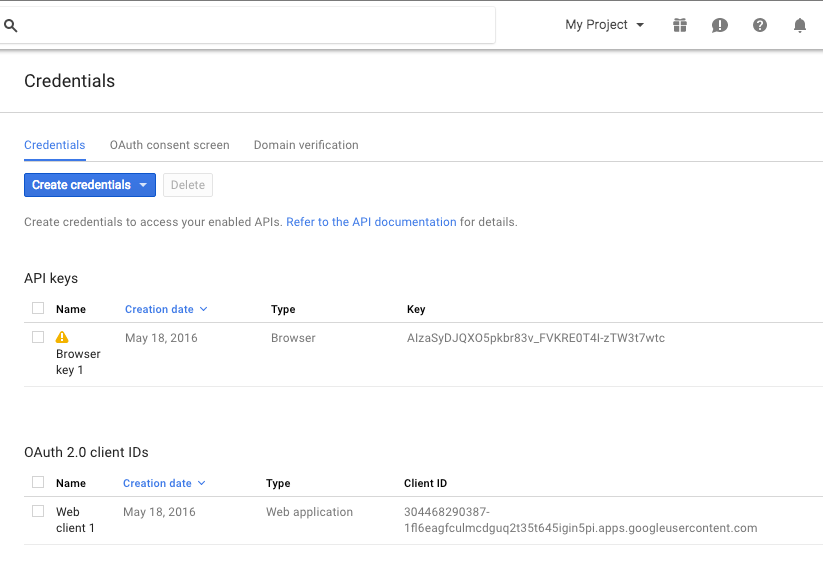
12. Your credentials screen should now look like this:
Add your credentials to your app
Copy credentials: Client ID. It will look something like 304468290387-xxxxxxxxxxxxxxxxxxxxxxxxxxxxxxxx.apps.googleusercontent.com.
Copy this into the CLIENT_ID variable in your Google Drive App.
GoogleDrive.CLIENT_ID = "988...apps.googleusercontent.com"
Get the File ID of your spreadsheet
1. Run the GoogleDriveAPI app. A permission screen should display, based on the credentials you entered. Click on "Allow".
2. If the Authorize button is enabled, click on it. You are now able to access the Google Drive API.
Getting the list of files on your Google Drive
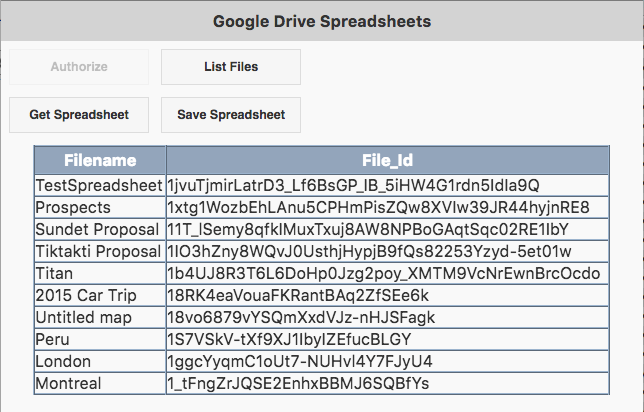
1. Click on "List Files". The files on your Google Drive will appear, along with their File IDs.

2. Get the FILE_ID for your spreadsheet from the File_Id column. Put that in the top of the app: it is hardcoded in the sample. You're welcome to use better ways to select the FILE_ID in your own app.
Reading and Writing Spreadsheets
Reading
Restart the app and click on Get Spreadsheet. The contents of the spreadsheet will appear. The code to do this is
btnGet.onclick = function() {
    GoogleDrive.getSpreadsheet(FILE_ID, getSpreadsheetCallback);
}

function getSpreadsheetCallback(results) {
    spreadsheet = results;
    console.table(results);
}
Notice that the getSpreadsheet call has a callback function. It may take a few seconds to get the spreadsheet: the callback function is called with the results when they are available.
Here is what shows in the Chrome Console:
Updating
You can now modify the spreadsheet in your code. The spreadsheet is stored as 2d array. Here's how to reference it:
spreadsheet[0][0]      - the top left corner
spreadsheet[0][1]      - the top item in second column.
spreadsheet[1][1] = "B2"   - Set the value of row 2, col 2 to "B2"
Saving
To write your spreadsheet out, use the saveSpreadsheet function:
btnSave.onclick = function() {
    GoogleDrive.saveSpreadsheet(spreadsheet, FILE_ID, saveSpreadsheetCallback);
}

function saveSpreadsheetCallback() {
    alert("done");
}
Once again, there is a callback function once the save is complete.


