Add AI to your app using ChatGPT: Difference between revisions
No edit summary |
No edit summary |
||
| Line 11: | Line 11: | ||
Once that is done, you will need to [https://platform.openai.com/api-keys get an API Key]. It's a long string you will need to paste into your app - see the sample code. | Once that is done, you will need to [https://platform.openai.com/api-keys get an API Key]. It's a long string you will need to paste into your app - see the sample code. | ||
Note that | Note that your API Key must be kept secret. For testing, it's fine to leave it hard coded in your app. However, if you deploy it to your website, anyone with a browser will be able to see it (and hijack it!) | ||
===== Sample ===== | ===== Sample ===== | ||
| Line 57: | Line 57: | ||
===== Notes ===== | ===== Notes ===== | ||
# ChatGPT has a number of models, with new ones being released regularly. Change the value of `model` to the one you would like to use. | |||
# You can specify other parameters like `temperature` in the `data` object. [https://platform.openai.com/docs/api-reference/chat/create See the API docs]. | |||
# Changes to your account at ChatGPT may not take place immediately. For example, we've seen a short delay from entering payments details to actually being able to use the API. | |||
# All of this is subject to change - this is a rapidly developing field. | |||
===== See Also ===== | ===== See Also ===== | ||
Latest revision as of 14:24, 17 September 2024
Introduction
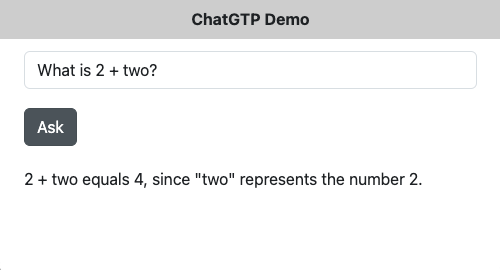
You can add AI capabilities to any AppStudio app. This can be in the form of a question box, or based on information that your app has collected about the user's needs. Almost any valid query will work, whether generated by the user or constructed by your app.
The method described here is based on ChatGPT, currently the most widely used AI assistant. Other AI assistants can be used. While their implementation details may differ, the general method will be similar.
The first step is to set up an account at ChatGPT. You will need to enter a credit card as well - but usage for testing purposes is quite inexpensive.
Once that is done, you will need to get an API Key. It's a long string you will need to paste into your app - see the sample code.
Note that your API Key must be kept secret. For testing, it's fine to leave it hard coded in your app. However, if you deploy it to your website, anyone with a browser will be able to see it (and hijack it!)
Sample
Here is some sample code, followed by notes on its usage:
const apiKey = "my-api-key"; // Replace with your actual API key

async function callChatGPT(prompt) {
  const url = "https://api.openai.com/v1/chat/completions";
  // Prepare the request body
  const data = {
    model: "gpt-4o-mini", // or 'gpt-4' if you have access
    messages: [{ role: "user", content: prompt }],
  };

  try {
    const response = await fetch(url, {
      method: "POST",
      headers: {
        Authorization: `Bearer ${apiKey}`,
        "Content-Type": "application/json",
      },
      body: JSON.stringify(data),
    });
    // Check if the response is ok (status code 200-299)
    if (!response.ok) {
      throw new Error(`HTTP error! status: ${response.status}`);
    }
    const result = await response.json();
    console.log("ChatGPT response:", result.choices[0].message.content);
    return result.choices[0].message.content;

  } catch (error) {
    NSB.MegBox("Error calling ChatGPT:", error);
  }
}

Button1.onclick = async function(){
  lblResults.innerHTML = "Processing..."
  result = await callChatGPT(inpQuestion.value);
  lblResults.innerText = result;
}
Notes
- ChatGPT has a number of models, with new ones being released regularly. Change the value of `model` to the one you would like to use.
- You can specify other parameters like `temperature` in the `data` object. See the API docs.
- Changes to your account at ChatGPT may not take place immediately. For example, we've seen a short delay from entering payments details to actually being able to use the API.
- All of this is subject to change - this is a rapidly developing field.
