PhoneGap CLI: Difference between revisions
| Line 41: | Line 41: | ||
</pre> | </pre> | ||
This will create a phonegap directory in your project and set it to make Android apps. | This will create a phonegap directory in your project and set it to make Android apps. Replace 'hello world' with the name of your app in the first command. | ||
=== Set AppStudio Preferences === | === Set AppStudio Preferences === | ||
Revision as of 19:33, 5 November 2014
Overview
PhoneGap Build is an easy to use service for creating native apps. However, you can also use PhoneGap CLI with AppStudio. It has the following advantages:
- Build takes place on your local machine - no uploading to a service
- Free - PhoneGap CLI is open source.
- No limit on number of projects
- Use the latest plugins: Sometime developers have newer versions of their plugin that are not in PhoneGap Build yet.
- Use PlugIns which are not in PhoneGap Build at all.
- Use custom PlugIns you have developed yourself.
But there are some disadvantages:
- Much more complicated to get working
- More difficult to use
- More difficult to sign apps for release
Install Tools
You need to do the following steps:
- Install Node.js
- Install Android SDK
- Install Java Development Toolkit (JDK)
- Install Apache ANT
- Set user variables
- Add items to PATH
- Install Cordova
There is a good tutorial on doing this here: http://www.scribd.com/doc/242544944/Phone-Gap
Create PhoneGap Project Files
PhoneGap CLI looks for a number of files in your project folder (or elsewhere if you have specified in Preferences). When you start a new project, you need to run a command to initialize the the directories. When you do a deploy from AppStudio, it updates these directories with your code.
To initialize a project so you can use it with PhoneGap CLI, use these commands in your project folder:
cordova create phonegap com.example.helloworld HelloWorld
cd phonegap
cordova platform add android
This will create a phonegap directory in your project and set it to make Android apps. Replace 'hello world' with the name of your app in the first command.
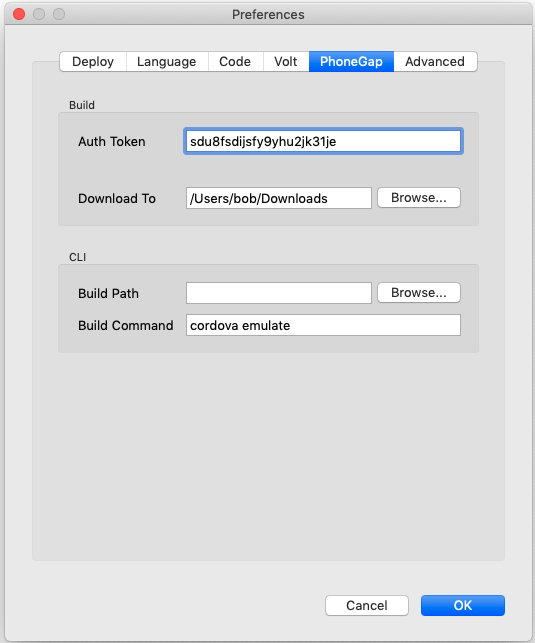
Set AppStudio Preferences
In AppStudio, go into the Preferences screen.
The Build Path will default to your project folder. If you initialized PhoneGap as specified in the previous step, you do not need to do anything.
The Build Command will run after the AppStudio saves your project into the phonegap directory. In this case, it will build your app and run it in the Android emulator. The contents of this field are standard command line format.
Build Your App
From the Run menu, choose "Build Native App with PhoneGap CLI".
You can also do it from the command line:
cordova build
Run Your App on the Android Emulator
If you have set your Preferences as above, the Android emulator will start.
To start from the command line, do
cordova emulate
