Making Desktop Apps with App Studio: Difference between revisions
No edit summary |
No edit summary |
||
| Line 5: | Line 5: | ||
Here are the steps: | Here are the steps: | ||
=== Check ChromeManifest in your Project Properties === | |||
You probably won't have to make any changes to get started: | |||
<pre>{{ "manifest_version": 2, | <pre>{{ "manifest_version": 2, | ||
"name": "{title}", | "name": "{title}", | ||
| Line 20: | Line 22: | ||
The size of the window for your running app is taken from defaultformsize in Project Properties. | The size of the window for your running app is taken from defaultformsize in Project Properties. | ||
=== Click on the "Build Desktop App" in the Run menu === | |||
This will create the package for distribution and open the [https://chrome.google.com/webstore/developer/dashboard Chrome Web Store Developer Dashboard]. | |||
=== Sign on to your Google Developer Account === | |||
If you don't have a Developer Account with Google, you will have to sign up for one. It costs $25.00 and involved clicking on some agreements. | |||
=== Upload your zip file === | |||
Select 'Add new item' and upload your zip file. The first time you do this, you will need to pay $5.00 "to verify your account and publish items". Once complete, 'Publish to test accounts'. It will ask you for some additional information to complete the submission. Don't worry - everything is well explained. | |||
* Detailed description | * Detailed description | ||
| Line 37: | Line 45: | ||
* a few other settings, all well explained. | * a few other settings, all well explained. | ||
=== Publish Changes === | |||
Once everything is complete, click on "Publish changes" at the bottom of the screen. | |||
=== Let it bake. === | |||
Google will then bake your submission into a Chrome Packaged App. This will take from 5 minutes to one hour. You need to keep refreshing the screen to see if it is complete: there is no automatic notification. For testers, send them the URL for the app. Public users can find the app in the Chrome Store. (Note that they have to use the Chrome browser.) It will look like this in either case: | |||
[[File:TN10.02.png]]<br> | [[File:TN10.02.png]]<br> | ||
=== Download the App === | |||
Click on "Free" (or otherwise) to download the app to your system. The app is saved in Chrome's private storage area. | |||
=== Start using Chrome App Launcher === | |||
You can see (and launch) Chrome Packaged Apps using the Chrome App Launcher: | |||
[[File:TN10.03.png]]<br> | [[File:TN10.03.png]]<br> | ||
=== Start using a shortcut === | |||
In Windows, you can create a shortcut. First, you need to get the App ID from the URL bar: | |||
[[File:TN10.04. | [[File:TN10.04.png]]<br> | ||
Now, create a MyProject.bat file with the following contents: | Now, create a MyProject.bat file with the following contents: | ||
Revision as of 14:53, 20 September 2013
Starting with AppStudio 3.2, you can turn your AppStudio apps into distributable Windows desktop apps, by making them into Chrome Packaged Apps. Users will need to have Chrome installed on their systems. The apps can be sold or given away for free in the Chrome Web Store. Google says that Mac and Linux support is coming soon.
Packaged apps deliver an experience as capable as a native app, but as safe as a web page. Just like web apps, packaged apps are written in HTML5, JavaScript, and CSS. But packaged apps look and behave like native apps, and they have native-like capabilities that are much more powerful than those available to web apps.
Here are the steps:
Check ChromeManifest in your Project Properties
You probably won't have to make any changes to get started:
{{ "manifest_version": 2,
  "name": "{title}",
  "version": "{version}",
  "offline_enabled": true,
  "description": "{description}",
  "icons": {{ "16": "nsb/images/16.png",
               "128": "nsb/images/128.png" }},
  "author": "{copyright}",
  "app": {{"background": {{"scripts": ["background.js"]}}}}}}
Go ahead and modify the paths to the icons if you have your own icons.
The size of the window for your running app is taken from defaultformsize in Project Properties.
This will create the package for distribution and open the Chrome Web Store Developer Dashboard.
Sign on to your Google Developer Account
If you don't have a Developer Account with Google, you will have to sign up for one. It costs $25.00 and involved clicking on some agreements.
Upload your zip file
Select 'Add new item' and upload your zip file. The first time you do this, you will need to pay $5.00 "to verify your account and publish items". Once complete, 'Publish to test accounts'. It will ask you for some additional information to complete the submission. Don't worry - everything is well explained.
- Detailed description
- Icon: 128x128
- Screenshots: 1280x800 or 640x480
- Promotional Images: 440x280, 920x680, 1400x560
- Website information
- Category (Education, Games, Productivity, etc.)
- Pricing and payments
- Regions
- Language
- a few other settings, all well explained.
Publish Changes
Once everything is complete, click on "Publish changes" at the bottom of the screen.
Let it bake.
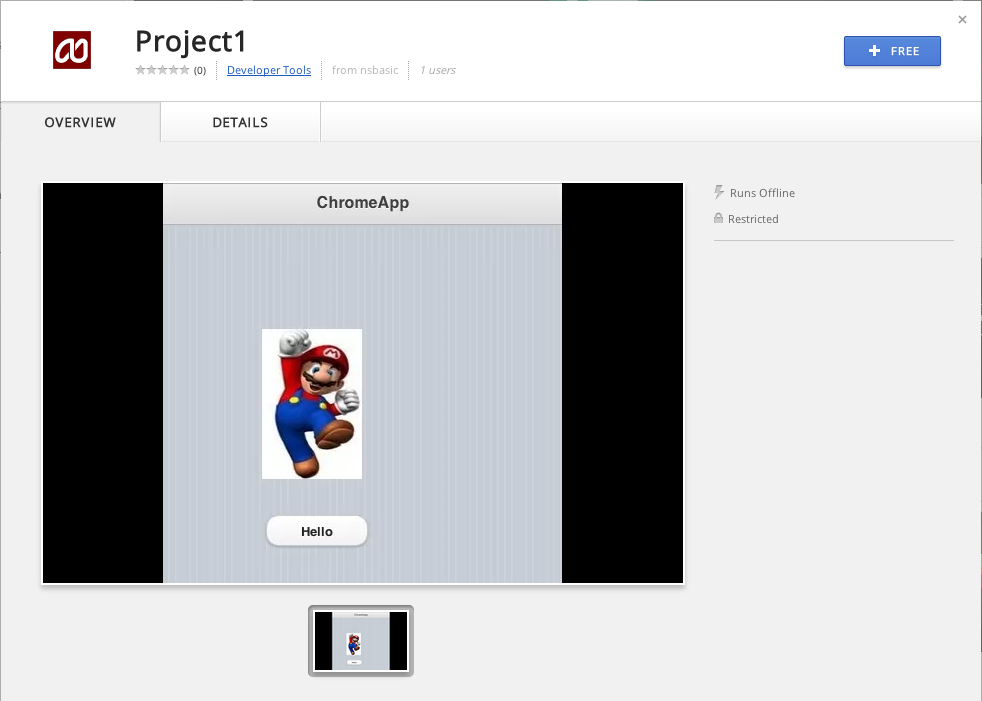
Google will then bake your submission into a Chrome Packaged App. This will take from 5 minutes to one hour. You need to keep refreshing the screen to see if it is complete: there is no automatic notification. For testers, send them the URL for the app. Public users can find the app in the Chrome Store. (Note that they have to use the Chrome browser.) It will look like this in either case:
Download the App
Click on "Free" (or otherwise) to download the app to your system. The app is saved in Chrome's private storage area.
Start using Chrome App Launcher
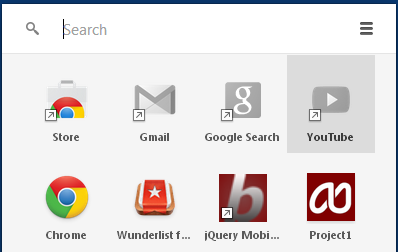
You can see (and launch) Chrome Packaged Apps using the Chrome App Launcher:
Start using a shortcut
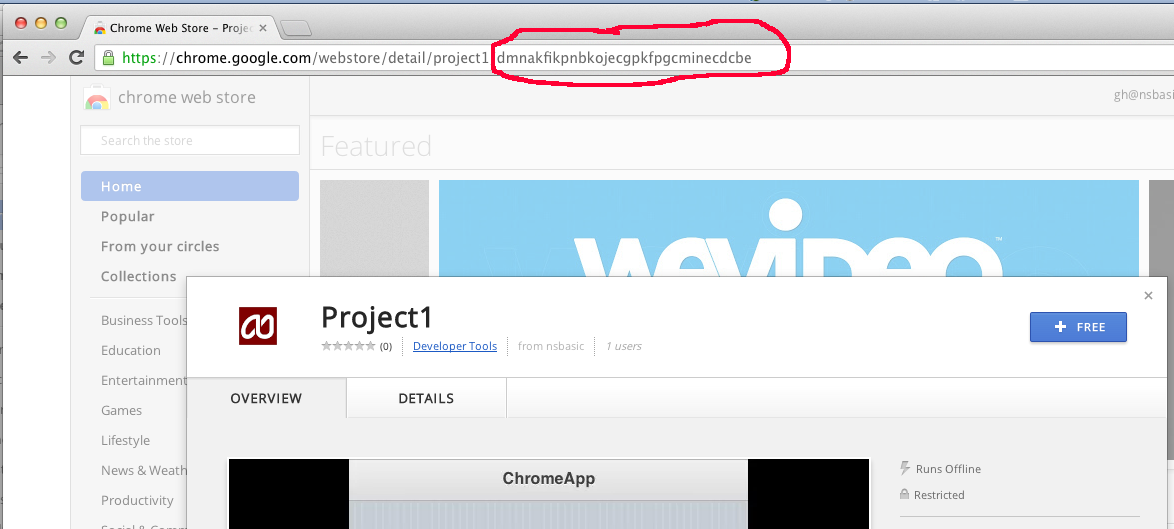
In Windows, you can create a shortcut. First, you need to get the App ID from the URL bar:
Now, create a MyProject.bat file with the following contents:
start chrome --app-id=dmnakfikpnbkojecgpkfpgcminecdcbe
You can start the app by clicking on your new file or a link to it.
It's Windows only for now, but Mac OS support is promised soon.


