Tour of the IDE: Difference between revisions
Jump to navigation
Jump to search
| Line 88: | Line 88: | ||
= ToolBox = | = ToolBox = | ||
[[file:3.3.jpg|center]] | |||
Controls are the building blocks for the visual elements of the form. When the Design Screen has the focus, the list of controls is displayed. | |||
* Controls are arranged by group. | |||
* Groups can be opened and closed by clicking on the triangle to the left of the group’s name. | |||
* A control may appear in more than one group. | |||
* Controls can be added to the Design Screen by drag & drop or by double clicking on the control in the Toolbox. | |||
== Libraries == | |||
[[file:3.3.2.jpg|center]] | |||
The list of Libraries displays when the Project Explorer is set to Project Properties and Global Code. | |||
* Libraries are “canned” code which can be added to your project, then used in your app. You will need to consult the documentation for these libraries to see what functions they add to your program. | |||
*Samples using Libraries can be found in the Libraries folder in Samples. | |||
<div class="page-break"></div> | <div class="page-break"></div> | ||
= Project Explorer = | = Project Explorer = | ||
Revision as of 15:29, 9 December 2013
Menus
File Menu
- New, Open and Save Projects
- Open Samples
- Export Form/Code...
Edit Menu
- Undo/Redo
- Cut, Copy, Paste, Delete
- Code Window:
- Find, Go to line, Block Comment/Uncomment
View
- Show and hide various parts of the IDE
- Reset IDE panels
Project
- Add Forms
- Add Code Files
Format
- Useful for the Design Screen
- Align to grid
- Centering controls
- Nudging controls
Run
- Start in Desktop Browser
- Deploy to a server
- Build using PhoneGap
- Build Chrome Native App
- Debugger
Tools
- Preferences
- ThemeRoller
Help
- Wiki
- Offline Wiki
- Blog
- TechNotes
- Tutorials
- Updates
Toolbar

The ToolBar gives you shortcuts to many of the menu items. They are, from left to right
- New Project
- Open Project…
- Save Project
- Undo
- Redo
- Cut
- Copy
- Paste
- Delete
- Find
- Add Form
- Start in Desktop Browser
Design Screen

The Design Screen shows the layout of the form. A control that is outlined in blue is the control being edited. It can be moved or resized using the grab handles on the edges.
- When you mouse down on a control, lines extend to the edges to help with positioning.
- If Size to Grid is selected in the Format menu, edges of controls will be positioned to the nearest multiple of 4. This also makes it much easier to position controls so they look attractive.
- Certain controls have a fixed size, or have their size determined by their properties. These controls will not be able to be resized.
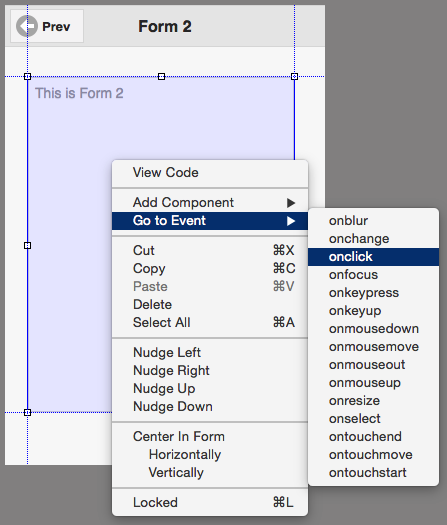
- Controls can be added to the Design Screen by drag & drop or by double clicking on the control in the Toolbox. They can also be added by right clicking on the form and selecting “Add Component”.
- Multiple controls can be selected and moved together.
Right click Options

- To go to the event code for a control, right click on it and select “Go to Event”.
- To view the code, right click and select View Code.
ToolBox

Controls are the building blocks for the visual elements of the form. When the Design Screen has the focus, the list of controls is displayed.
- Controls are arranged by group.
- Groups can be opened and closed by clicking on the triangle to the left of the group’s name.
- A control may appear in more than one group.
- Controls can be added to the Design Screen by drag & drop or by double clicking on the control in the Toolbox.
Libraries

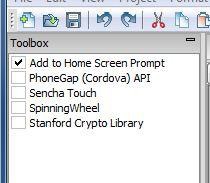
The list of Libraries displays when the Project Explorer is set to Project Properties and Global Code.
- Libraries are “canned” code which can be added to your project, then used in your app. You will need to consult the documentation for these libraries to see what functions they add to your program.
- Samples using Libraries can be found in the Libraries folder in Samples.