var weather = require("weather-js");
Button1.onclick = function() {
weather.find({search: "San Francisco, CA", degreeType: "F"}, weatherFindCallback);
};
function weatherFindCallback(err, result) {
if(err) {
NSB.MsgBox(err);
} else {
NSB.Print(JSON.stringify(result, null, 2));
}
}
Using Node and Electron to build Desktop Apps
-
Node.is
-
Node Package Manager
-
Electron
Introduction
AppStudio now supports the use of some of the most important new technologies in the web development world.
Node.js is a runtime environment that executes JavaScript code outside the browser. That makes it suitable for writing server side software, which would normally be done in PHP or other languages. It works by having an executable stub which is able to call the V8 JavaScript engine, which powers Chrome.
npm is a repository of code which can be used with Node.js. It's included when you download Node. There is a huge number of packages available - over 750,000 at last count. You can include these packages in your Node project to add functionality. It might be for convenience: there are a lot of libraries which are much easier to include in your project than to write yourself. It might be for functionality: the modules can implement features which would not be available in the browser.
An example of a convenient library would be Lodash which adds hundreds of additional functions to JavaScript. A missing feature library would be fs-extra which allows full access to the file system.
Electron is framework which allows for the development of desktop GUI applications. Since it's built on Node.js, it already has the ability to run JavaScript code. It also uses Chrome's browser engine to render the UI using regular HTML. Each Electron app includes the V8 Runtime as well as the Chrome browser. Slack, Github Desktop and WhatsApp are examples of apps built using Electron.
How is this compare to PhoneGap?
PhoneGap (Cordova) is used to package apps for iOS and Android. Electron is used to package apps for Windows, MacOS and Linux. It's quite reasonable to have one AppStudio project that you use with both PhoneGap and Electron, letting you build for all 5 platforms.
Nodejs/npm modules are similar to PhoneGap Plugins. Since they are operating system specific, PhoneGap Plugins will not work with Electron (and vice versa).
Tutorial: Make an Electron app
AppStudio allows you to make normal AppStudio apps (programmed in Javascript or BASIC) into full blown Electron apps. You can distribute these apps as regular executables, able to run on Windows, MacOS and Linux.
In this tutorial, we're going to use a module from npm called weather-js to create an app which gets weather data from weather.service.msn.com. It's very convenient: we don't have to figure out the MSN API to use it.
You will have to know how to use the command line (Terminal on MacOS, cmd or Powershell on Windows) and have AppStudio 7.3.0 or later installed.
Set up the project
1. Download and install Node. (This also installs npm.)
https://nodejs.org/en/download/
2. Using AppStudio, create a new project called ElectronWeather and save it.
3. Open a command line window in the newly created ElectronWeather.appstudio folder and type
npm init
This asks a few questions, then creates a file named package.json, which has configuration info for npm and Electron. Use the the defaults, except for entry point:
$ npm init
This utility will walk you through creating a package.json file.
It only covers the most common items, and tries to guess sensible defaults.

See `npm help json` for definitive documentation on these fields
and exactly what they do.

Use `npm install <pkg>` afterwards to install a package and
save it as a dependency in the package.json file.

Press ^C at any time to quit.
package name: (ElectronWeather.appstudio)
version: (1.0.0)
description:
entry point: (electronMain.js)
test command:
git repository:
keywords:
author:
license: (ISC)
About to write to /Users/george/ElectronWeather.appstudio/package.json:

{
  "name": "ElectronWeather.appstudio",
  "version": "1.0.0",
  "description": "",
  "main": "electronMain.js",
  "scripts": {
    "test": "echo \"Error: no test specified\" && exit 1"
  },
  "author": "",
  "license": "ISC"
}

Is this OK? (yes) yes
4. We can now add some libraries from npm to our project. In the same command line window, type the following:
npm install weather-js
npm install electron
npm install electron-packager
Be careful not to install weather.js - it's a totally different library!
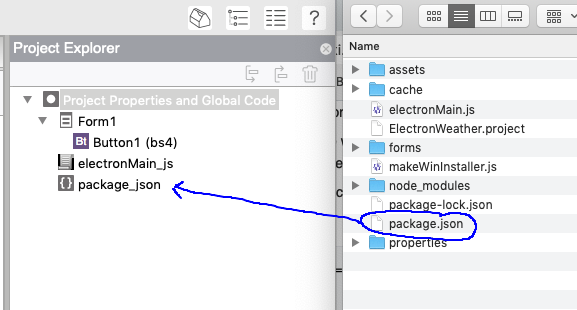
5. Drag and drop package.json into the Project Explorer window in AppStudio. This adds the file to the project.
6. Open package.json in AppStudio. Modify scripts so package.json looks like this: (don't worry about the version numbers - the latest version s will be used.)
{
  "name": "electronweather.appstudio",
  "version": "1.0.0",
  "description": "",
  "main": "electronMain.js",
  "scripts": {
    "start": "electron ."
  },
  "author": "",
  "license": "ISC",
  "dependencies": {
    "electron": "^4.0.5",
    "electron-packager": "^13.1.0",
    "weather-js": "^2.0.0"
  }
}
7. Using a text editor, create a file called electronMain.js in your project folder, with the following code in it. For more information on this file, check out electronMain.js.
const {app, BrowserWindow, Menu} = require('electron');
const path = require('path');
const url = require('url');

let mainWindow;

function createWindow () {
  mainWindow = new BrowserWindow({
  	width: 768,
  	height: 1004,
  	icon:__dirname+'/img/AppStudio.icns',
  	title: 'Electron Weather',
  	webPreferences: {nodeIntegration: true},
  	})

  mainWindow.loadFile('index.html')

  mainWindow.webContents.openDevTools()

  mainWindow.on('closed', function () {
    mainWindow = null
  })
}

app.on('ready', createWindow)

app.on('window-all-closed', function () {
  if (process.platform !== 'darwin') app.quit()
})

app.on('activate', function () {
  if (mainWindow === null) createWindow();
})
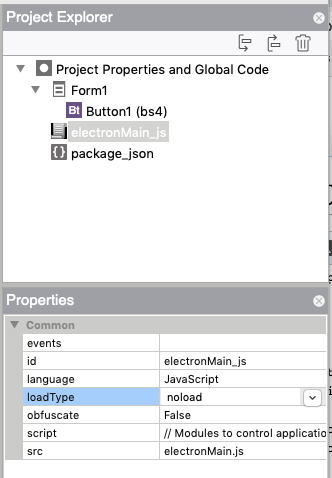
8. Drag and drop electronMain.js into the Project Explorer window of AppStudio. In the file's properties, set loadType to 'noload'.

Add the Weather Code
1. Add a button to Form1.
2. In the code window for Form1, paste the following code. You'll notice there is a new function called 'require' in the first line. This function is part of Node.js: it loads the module of that name.
Since this function is not part of JavaScript, the project will not run in the browser as a normal project would.
weather = require("weather-js")

function Button1_onclick()
  weather.find({search: "San Francisco, CA", degreeType: "F"}, weatherFindCallback)
End function

function weatherFindCallback(err, result)
  If err Then
    MsgBox(err)
  else
    Print JSON.stringify(result, null, 2)
  End if
End function
Set up the Deploy
1. Add this string to extraheaders in Project Properties:
<!-- Electron -->
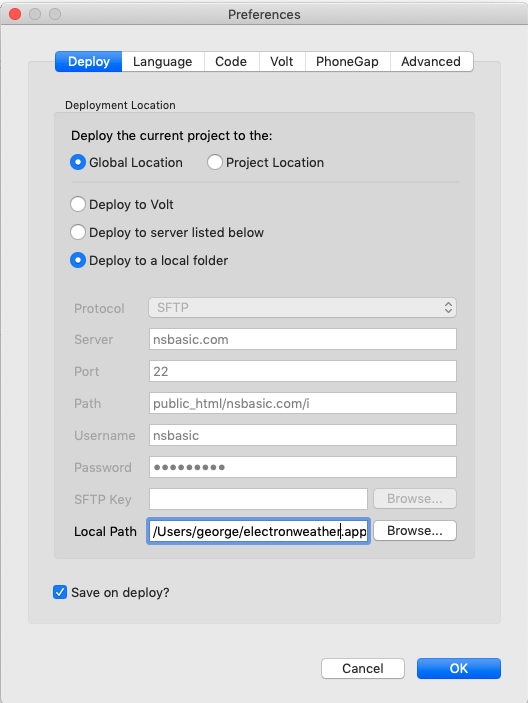
2. In AppStudio Preferences, select 'Deploy to a local folder' and select a folder to deploy to.
3. Click on Deploy in the Run menu. This will deploy your app to your local-deploy/ElectronWeather. It will ask you if you want to visit the project - click no.
4. Open another command line window in local-deploy/ElectronWeather and type
npm install
This will install all the node files needed to run your project. You won't have to do this step again unless you change the node modules your app uses.
Run the App
1. Now we're ready to run the app. From the same command line window, enter
npm start
Here's the output after we click on the button:
Some notes
- The Chrome Debugger window opens by default. We'll need this if we are going to debug the app.
- To turn off the Chrome Debugger, comment out line 18 in electronMain and run again.
- The "Electron Security Warning" in the console can be ignored.
Icons
You probably noticed that your app is using the Electron icon to identify itself. You'll want to use your own.
1. Add a folder in ElectronWeather.appstudio called Assets. It should have 3 subfolders as follows:
2. Put 'assets' into the manifest property in Project Properties.
3. Save and deploy so the new assets folder is copied into local-deploy.
Distributing the App
We now have a running app. The next step is to package it for distribution. We can make regular executables for distribution on MacOS, Windows and Linux. The packaging has to done on a computer running the OS we are targeting: the MacOS version needs to be build on a Mac, etc.
There is more documentation on packaging at https://github.com/electron-userland/electron-packager
Here's how:
1. In AppStudio, edit package.json. Add the following lines so the scripts property looks like this:
"scripts": {
    "start": "electron .",
    "package-mac": "electron-packager . ElectronWeather --overwrite --platform=darwin --arch=x64 --icon=assets/icons/mac/icon.icns --prune=true --out=release-builds",
    "package-win": "electron-packager . ElectronWeather --overwrite --platform=win32 --arch=ia32 --icon=assets/icons/win/icon.ico --prune=true --out=release-builds --version-string.CompanyName=CE --version-string.FileDescription=CE --version-string.ProductName=\"Electron Weather\"",
    "package-linux": "electron-packager . ElectronWeather --overwrite --asar=true --platform=linux --arch=x64 --icon=assets/icons/png/1024x1024.png --prune=true --out=release-builds",
    "makewin": "node makeWinInstaller.js"
  }
2. Save and deploy again so the updated package.json is in local-deploy.
MacOS
3. From the command line we have open in local-deploy/ElectronWeather, type this:
npm run package-mac
When complete, you'll find the executable here: local-deploy/ElectronWeather/release-builds/ElectronWeather-darwin-x64
You will want to compress the file so it can easily be distributed as a zip.
Windows
3. From the command line we have open in local-deploy/ElectronWeather, type this:
npm run package-win
npm run makewin
When complete, you'll find the executable here: local-deploy/ElectronWeather/release-builds/windows-installer.


