JavaScript, HTML, CSS: Difference between revisions
Jump to navigation
Jump to search
| Line 203: | Line 203: | ||
x = x + 1 'BASIC | x = x + 1 'BASIC | ||
</pre> | </pre> | ||
# Create a <script> line in the extraheaders Project Property. | |||
== Included Libraries == | == Included Libraries == | ||
Revision as of 19:18, 12 December 2013
What's behind the scenes?
- In this section, we will learn more about the internals of AppStudio.
- AppStudio is built on top of HTML5, css3 and JavaScript.
- We deliberately left those parts accessible.
- Makes it easy to learn more about HTML5, css3 and JavaScript.
- Advanced users can build almost anything.
Translator

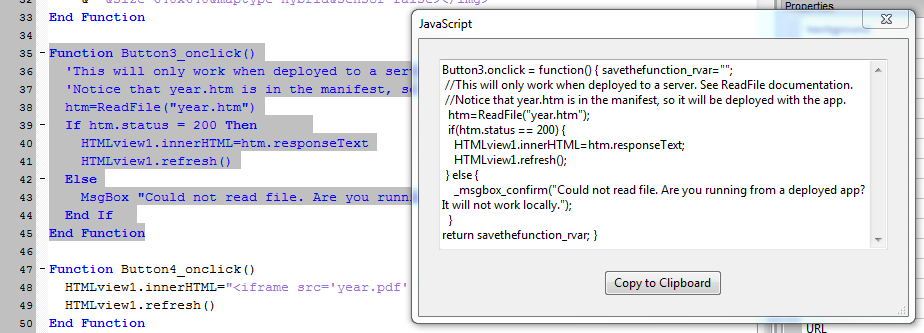
- When an AppStudio program is run, all BASIC code is converted to JavaScript.
- JavaScript is fast!
- JavaScript on a iPhone 5S is almost twice as fast as VB.Net on a desktop!
- Latest iPhones are 100x faster than the original.
- Translation happens only to code modules which have changed.
- You can see your BASIC translated to JavaScript by right clicking in the Code Window.
Controls
- The forms and controls in your project generate css and HTML
- The css defines the controls.
- Controls are identified by their ids.
- The ids are declared in the DOM window object.
- While is why we can do TextBox1.value.
- For each control, a string of HTML is also created.
- These strings are put into an array.
- The array is joined together and put into the form's innerHTML.
- Just like what we were doing the HTMLview!
- Let's look at the css for a button:
#Button1 {position:absolute; left:43px; right:auto; top:96px;
bottom:auto; height:29px; width:100px}
- Here is the generated HTML and JavaScript for that same button:
Form1.innerHTML=[  "<div id='Button1' data-role='button' data-inline=true
data-theme=c data-icon=false data-iconpos=none data-mini=true
data-corners='true' class=' ' style='margin:0px; overflow:visible;
font-size:12px; font-family:helvetica; font-style:normal; font-weight:bold;
color:; background-color:; '>Button</div>",
  ].join('');
Generated Index.html
- The translated code for the app and the css, HTML and Javascript for the controls are all written to a file called Index.html.
- Let's have a look at the file.
- First, there is the manifest.
- This file contains the list of files to be saved locally on the device.
- An app cannot run offline unless all files are listed here.
<!DOCTYPE HTML>
<html manifest="OfflineApp.appcache">
- The <head> section sets up general information about the app.
- Much of it comes from the information in Project Properties.
<head>
<meta charset="utf-8">
<title>Project2</title>
<meta name="generator" content="NSB/AppStudio 3.3.0.0$mgvb" />
<meta name="date" content="2013-12-12 13:44:58.613000" />
<meta name="version" content="1.0.0" />
<meta name="viewport" content="width=device-width minimum-scale=1.0, maximum-scale=0.6667, user-scalable=no" />
<meta name="apple-mobile-web-app-capable" content="YES" />
<meta name="mobile-web-app-capable" content="yes" />
<meta name="apple-mobile-web-app-status-bar-style" content="black-translucent" />
<meta name="apple-mobile-web-app-title" content="">
<meta name="copyright" content="Copyright 2013 ABC Company" />
<link rel="apple-touch-icon" href="nsb/images/LauncherIcon57.png" />
<link rel="apple-touch-startup-image" href="nsb/images/SplashScreen.png" />
<link rel="shortcut icon" sizes="196x196" href="nsb/images/196.png"/>
- This is where the files the app uses get loaded.
- JavaScript files use a script tag.
- css files use a link tag.
- The list of files depends on the controls which are used.
<script src="nsb/hfunc.js"></script>
<script src="nsb/messages.js"></script>
<link href="nsb/nsbstyle.css" rel="stylesheet">
<script src="nsb/fastclick.js"></script>
<script src="nsb/jquery.js"></script>
<script src="nsb/jquery.mobile.js"></script>
<link href="nsb/jquery.mobile.css" rel="stylesheet">
- Next comes the css for the controls
- and we define the default font for the form, also a Project Property.
<style type="text/css">
#Button1 {position:absolute; left:43px; right:auto; top:96px; bottom:auto; height:29px; width:100px}
body * {font-family:helvetica}
</style>
</head>
- Now it's time the body of our app.
- FastClick is a library which makes touch events as fast as clicks.
<body style="margin:0px;">
<script>window.addEventListener('load', function() {new FastClick(document.body)}, false)</script>
- Now it's time to define our forms.
- This project only has one: Form1
<div data-role="page" id="Page_Project2" data-theme="c" style="">
<form id="Form1" action="" method="GET" onsubmit="return false;" style="display:none; height:100%; position:absolute; top:0px; left:0px; width:100%; ">
<script>
Form1.innerHTML=[  "<div id='Button1' data-role='button' data-inline=true data-theme=c data-icon=false data-iconpos=none data-mini=true data-corners='true' class=' ' style='margin:0px; overflow:visible; font-size:12px; font-family:helvetica; font-style:normal; font-weight:bold; color:; background-color:; '>Button</div>",
  ].join('');
</script>
</form>
</div>
- With all that set up, we can start on the code.
- General housekeeping comes first.
- Put all the ids into the DOM window:
<script>
(function(){var all=document.getElementsByTagName('*');for(var i=0;i<all.length;i++)if(typeof all[i].id!='undefined'&&typeof window[all[i].id]=='undefined')window[all[i].id]=all[i];})()
- Put up a message if the browser does not support AppStudio
browserWarningMessage('Please use Google Chrome, Apple Safari or another supported browser.');
- Use a different splashscreen if running on an iPad
if (navigator.userAgent.indexOf('iPad') !== -1) {
  var splashscreen = document.createElement('link');
  splashscreen.rel = 'apple-touch-startup-image';
  splashscreen.href = '';
  document.getElementsByTagName('head')[0].appendChild(splashscreen);
}
- Add some properties to the controls and form so they act more like VB
window.addEventListener('load', function() {
  Form1.style.display = 'block';
  NSB.addDisableProperty(Button1);
  NSB.addProperties(Button1);

  Form1.style.display = 'none';
}, false);
Form1.onsubmit=function(event){window.event.stopPropagation();window.event.preventDefault()};
NSB.addProperties(Form1);
- Here is our actual code, converted to JavaScript
Button1.onclick = function() { savethefunction_rvar="";
  _msgbox_confirm("Hello World!");
return savethefunction_rvar; }
- When loading is done, show the first form and call Sub Main()
window.addEventListener('load', function() {
  Form1.style.display = 'block';
  Main();
  if (typeof(Form1.onshow)=='function') Form1.onshow();
}, false);

var NSBCurrentForm = Form1;
- and the rest is HTML formatting.
</script>
</body>
</html>
- Note that the details of the above may change in future releases.
JavaScript Libraries
- AppStudio makes it easy to include JavaScript libraries.
- These are equally easy to use from BASIC or JavaScript.
- If something can be done in JavaScript, there probably is a library for it already.
Ways to include
- Drag it into the Project Window. It will get loaded into your Index.html when your app is generated.
- Create a new Code Module. Set its language to JavaScript. Paste the code in.
- Put it in the middle of your BASIC code. Using the JavaScript statement, you can mix JavaScript and BASIC in the same module.
x = x + 1                    'BASIC
JavaScript
  if(x==3){alert('x=3!');    //JavaScript
End JavaScript
x = x + 1                    'BASIC
- Create a <script> line in the extraheaders Project Property.