SplashScreens: Difference between revisions
| Line 54: | Line 54: | ||
<pre> | <pre> | ||
<preference name="SplashScreenDelay" value="2000" /> | <preference name="SplashScreenDelay" value="2000" /> | ||
<preference name="AutoHideSplashScreen" value="true" /> | |||
<gap:splash src="{splashscreen}"/> | <gap:splash src="{splashscreen}"/> | ||
Revision as of 14:03, 23 October 2015
SplashScreens are displayed when your app starts. The way they work depends on the platform you are running on.
Web Apps
Splash screens only work on iOS. They are not supported on Android. To have them work effectively, you need to supply images for all the supported screen sizes.
Here's how to add splash screens:
- Add folder named 'splash' to your project directory.
- Drag it into the Project Explorer
- Add a folder named 'ios' to the new 'splash' folder.
- In the ios folder, put the following files:
  320X460.png
  640x920.png
  640x1096.png
  748x1024.png
  768x1004.png
  1496x2046.png
  1536x2008.png
New for iPhone 6 and 6 Plus:
  1242x2148.png
  2208x1182.png
  750x1284.png
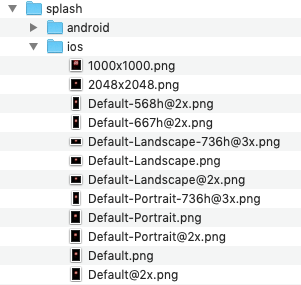
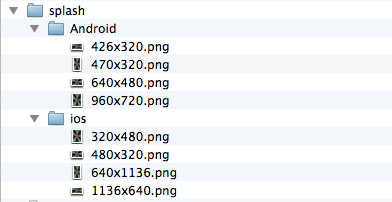
The resulting file structure will look something like this:

PhoneGap Apps
The default PhoneGap SplashScreen must be set in Project Properties. The file needs to be in the top level of the project folder. PNG images work best: the filename should also be added to the Manifest property.
The same file structure can be used as in Web App for the rest of the splashscreens. Here's how it could look:
The Web App images can be in the same folder.
Android
A similar file structure is needed as for web apps, but the screen sizes are different:
Create a folder in your Splash folder called android. Add the following files:
 960x720.png
 640x480.png
 470x320.png
 426x320.png
 720x960.png
 480x640.png
 320x470.png
 320x426.png
Add the following lines to the PhoneGap configxml property:
<preference name="SplashScreenDelay" value="2000" />
<preference name="AutoHideSplashScreen" value="true" />
<gap:splash src="{splashscreen}"/>

<platform name="android">
  <splash src="splash/android/426x320.png" density="land-ldpi" />
  <splash src="splash/android/470x320.png" density="land-mdpi" />
  <splash src="splash/android/640x480.png" density="land-hdpi" />
  <splash src="splash/android/960x720.png" density="land-xhdpi" />

  <splash src="splash/android/320x426.png" density="port-ldpi" />
  <splash src="splash/android/320x470.png" density="port-mdpi" />
  <splash src="splash/android/480x640.png" density="port-hdpi" />
  <splash src="splash/android/720x960.png" density="port-xhdpi" />
</platform>
iOS
A similar file structure is needed as for web apps, but the screen sizes and file names are different. See the file names and sizes as they appear in the configxml property. Create files of your own with the same names and sizes.
Assuming you want all sizes, add the following lines to the PhoneGap configxml property:
<preference name="SplashScreenDelay" value="2000" />
<gap:splash src="{splashscreen}"/>

<platform name = "ios">
  <splash src='splash/ios/Default.png' width='320' height='480' />
  <splash src='splash/ios/Default@2x.png' width='640' height='960' />
  <splash src='splash/ios/Default-568h@2x.png' width='640' height='1136' />
  <splash src='splash/ios/Default-Portrait.png' width='768' height='1024' />
  <splash src='splash/ios/Default-Landscape.png' width='1024' height='768' />
  <splash src='splash/ios/Default-Portrait@2x.png' width='1536' height='2048' />
  <splash src='splash/ios/Default-Landscape@2x.png' width='2048' height='1536' />
</platform>