Kesbath: Pictureboard
Version 1.00
Hint: Save your code with a new filename every time in works! If things go wrong you can go back quickly to a known working version.
Version 1.01
Open a New Project and save it to your P drive (AppStudio folder). You will need a form height of about 460 and a width of 800.
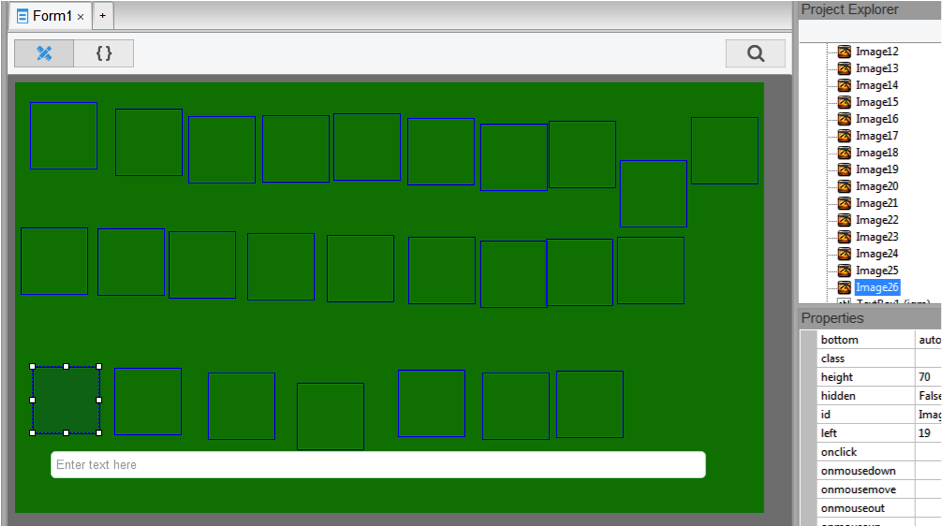
Add 26 Images and one Textbox…. Like this…
Rearrange the 26 images so that they look like the 26 keys of a Qwerty Keyboard with Image1 in position A and Image26 in position Z (as shown above).
So that the code that will be added below works, you need to rename Image1 to Image9 so that they read Image01… Image02 to Image09.
You now need 26 animated gif images to represent each letter!
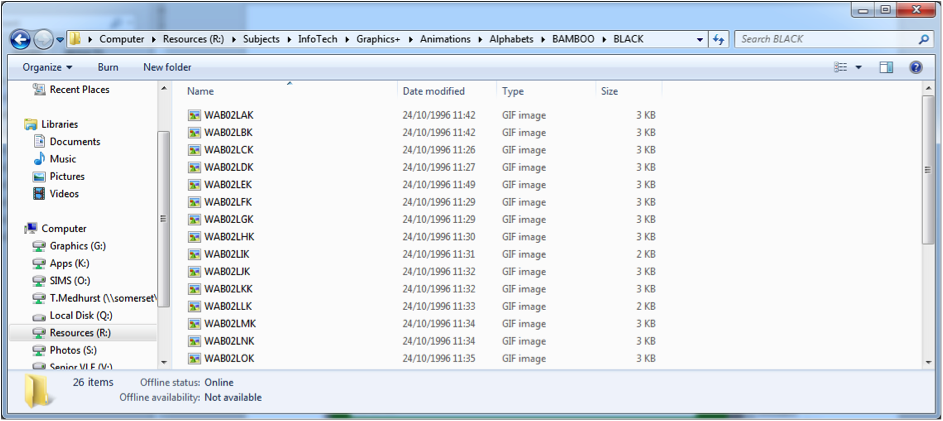
You will find these on the school network (R:\Subjects\InfoTech\Graphics+\Animations\Alphabets\BAMBOO\BLACK) and as shown here…
There are other folders with alternative collections which you can choose. Copy all 26 to the folder that your AppStudio program is stored in.
You also need a 27th image, to represent the non displayed letter….
You could use the Animated globe found in R:\Subjects\InfoTech\Graphics+\Animations.
Now set the src for all 26 images to the letter that they will contain. That is A for Image1 to Z for Image26. Create a 27th Image and add the Globe to that. This image can be set to hidden.
Test that it works! You should see all 26 animated letters, but not the hidden globe.
Version 1.02
Now to add the code that will start to control the images.
First we need to replace all the letters with the "globe” image. Copy and paste the code from below into the code section.
Rem Version 1.02
Dim Display
Display = 0

Sub Main
For L = 1 To 26
   ResetImage(L)
Next
End Sub

Function ResetImage(ImageCode)
  Dim UpImage
  Dim location
  location = "Image" + Right("0"+CStr(ImageCode),2)
  UpImage  = new Object
  UpImage = Eval(location)
  UpImage.src = "globe.gif"
  Display = 0
End Function
If the file you have chosen as the background is not "globe.gif” then you will need to change the filename above. The Function ResetImage simply places "globe.gif” into the Image number given by ‘ImageCode’. This is called in Sub Main which has a loop (L) going from 1 to 26. Carryout a test change the For L=1 to 26 to For L=5 to 26 you should notice that the letters A – D remain, whilst globes are positioned in all the other locations. Now try For L =1 to 20 – What letters will be displayed now – guess first, then test. Return the line to the correct value… For L=1 to 26
Version 1.03
First we need to help the computer to know all the letters.. The first piece of code comes after…
Rem Version 1.03
Dim Display
Display = 0

Dim FileLetter, FilePath, FileEnd
FileLetter = Array(" ","A", "B", "C", "D", "E", "F", "G", "H", "I", "J", "K", "L", "M", "N", "O", "P","Q","R","S","T","U","V","W","X","Y","Z")
FilePath = "WAB02L"
FileEnd = "K.gif"
Copy and paste the lines above into AppStudio. This sets up the 3 parts of the filename for each letter. If you have chosen a different set of letters then you will need to change FilePath = "WAB02L to the first part of the filename. You may need to change the end part to, that is FileEnd = "K.gif"
Now for the Function that reveals the letter when the mouse moves over it… We will later need 25 more of these functions to carryout the appropriate code for the other 25 Images / letters. This code should be added after this part of your existing program..
Sub Main
For L = 1 to 26
  ResetImage(L)
Next
End Sub

Function Image01_onmousemove()
  PicShow(1)
End Function
Paste the above code in now. However revealing the letter is more complex… It needs two further routines… These pieces of code should be pasted to the end of your program…
Sub PicShow(DisplayCode)
  If Display = 0 Then
  UpdateImage(DisplayCode)
Else
  ResetImage(DisplayCode)
  End If
  Display = 1 - Display
End Sub

Sub UpdateImage(ImageCode)
  Dim UpImage
  Dim location
  location = "Image" + Right("0"+CStr(ImageCode),2)
  UpImage  = new Object
  UpImage = Eval(location)
  UpImage.src = FilePath + FileLetter(ImageCode) + FileEnd
  Display = 1
End Sub
Test the above code. When you move the Mouse over the A position the globe changes to the letter A!
Version 1.04
Now we need to put the globe back in place after the mouse leaves the location…
To do this we need to add a second function directly after the end Function of onmousemove()
Function Image01_onmousemove()
  PicShow(1)
End Function

Function Image01_onmouseout()
  ResetImage(1)
End Function
Paste the code in and test that it works. That is the A appears when the mouse hovers over and the globe returns when you move out.
Version 1.05
These 6 lines of code…
Function Image01_onmousemove()
  PicShow(1)
End Function
Function Image01_onmouseout()
  ResetImage(1)
End Function
Now need to be copied and pasted 25 times. Then the numbers will need to be changed… for Image 2 as below…
Function Image02_onmousemove()
  PicShow(2)
End Function
Function Image02_onmouseout()
  ResetImage(2)
End Function
To 26 as below…
Function Image26_onmouseout()
  ResetImage(26)
End Function
Function Image26_onmousemove()
  PicShow(26)
End Function
Carefully make all these changes, though you are recommended to change one button with the 2 functions and test it. That way if you make an mistake it will be easier to spot. Now test to see that every letter reveals itself and covers itself on exit!
Version 1.06
Now we need to add the code that inserts the letter into the textbox when you click on it. Yet another function is needed for every image…
Function Image01_onclick()
  TextBox1.value = TextBox1.value + FileLetter(1)
End Function
Copy and paste the code below the end Function of Function Image26_onmousemove() at the end of V1.05
Test to see if you can click on the A and an ‘A’ appears in the textbox!
Version 1.07
Once again we need to duplicate the code 25 times and change the 1 / 01 to 2 / 02 down to 26 / 26!
Function Image02_onclick()
  TextBox1.value = TextBox1.value + FileLetter(2)
End Function
.
.
Function Image26_onclick()
  TextBox1.value = TextBox1.value + FileLetter(26)
End Function
Test that your changes work with all letters.
Version 1.1
We now need to add a piece of text for the user to type in. Add a label at the top of the form and set its text to "The quick brown fox jumped over the lazy dog” – change the colour of the label so that it stands out.
Test that it works! Try to type the sentence in and you will notice a problem…
Version 1.11
We do not have a space bar! Create a Button to go below the 26 letters but above the textbox. Change it so that it reads Space bar. Look at Function Image26_onclick() can you modify the code for the Button to insert a space??
Hint1: A space would need to be " "
Hint2: TextBox1.value = TextBox1.value + " "
Version 1.12
Now we need to work on being able to test the letter entered to see if it matches the next desired letter. This requires us to perform a test before adding it to the textbox. It would be lengthy to have to keep on changing the 26 onclick functions, though we cannot leave them as they are! Change all 26 functions so that they read like below and add the new subroutine Addletter…
Function Image25_onclick()
  Addletter(25)
end Function
Function Image26_onclick()
  Addletter(26)
End Function

Sub Addletter(Code)
  TextBox1.value = TextBox1.value + FileLetter(code)
End Sub
Although the code has changed this does not yet add functionality.
Test to see if it works as it did before..
Version 1.13
Now we can develop Addletter so that it can do more. For example play a sound if the correct letter is entered or the wrong sound if not… We will now develop this mini program or Sub routine…
We need to see if the letter entered is correct. This is a decision that we must program the computer to make. A way to make the decision is to use an IF statement.
We need to test the letter given with the letter in the label1.text.
Yet we need to know which letter to test with. So we need to count the number of characters already in textbox1. This we can do with Len(TextBox1.value) + 1 < The reason for the +1 is that we need to look at the next letter!
Sub AddLetter(Code)
  Dim WhichLetter
     WhichLetter  = Len(TextBox1.value) + 1
    If UCase(Mid(Label1.text,WhichLetter,1)) = FileLetter(Code) Then
    TextBox1.value = TextBox1.value + FileLetter(Code)
    End If
'Label2.text = UCase(Mid(Label1.text,WhichLetter,1)) + FileLetter(Code)
End Sub
Version 1.14
There is a line of the code which is "rem’d” out (in green in AppStudio. This line is to help you see what the code compares. To try it out you will need to add a Label2 to the form and un rem it. It should then show 2 letters. The first is the letter it expects to see, the second is the letter you just clicked. This is a useful way to see what is happening in your program. Test this and then remove the line and the label.
Version 1.15
We need to make the user aware that they have pressed a key and that it has been tested and that it is wrong. Using a negative sound would be a good way to do this. To do this add an Audio1() from the Multimedia part of the toolbox… Add a mp3 sound like UtopiaError from R:\Subjects\InfoTech\Resources+\Sounds\mp3. This must be pasted into the folder where AppStudio is stored and then set the Audio1.src property to this file (Remember to use the P drive). You may use an alternative sound but it needs to be short less than 1 second.
The code needed to play it and where to locate it is shown below…
Notice that this needs to be added with an Else statement and before the end if..
Version 1.16
We now need to test to see if all the letters have been correctly entered and the game has reached its end point. This will occur when the last letter has been successfully entered, so we can use AddLetter to do this extra task for us…..
  If UCase(TextBox1.value) = UCase(Label1.text) Then
    MsgBox("Game Over - Well done.")
    TextBox1.value = ""
  End If
Ucase is used above so that everything is converted to capitals.
Version 1.17
Can you add a more cheerful sound when the game is won?
Can you add a short cheerful sound when the correct key has been pressed?
Version 1.18
At the end of the game it would be good to get the computer to choose a new phrase at Random. We would need to provide the phrases. We can use a Subroutine with a Select Case statement to do this…
Sub NewPhrase()
  Dim Sentence
  Sentence = 1 + Int(3*Rnd())
  Select Case Sentence
    Case 1
      Label1.text = "The quick brown fox jumped over the lazy cat"
    Case 2
      Label1.text = "The new phrase is a big hit"
    Case 3
      Label1.text = "The can be three or more phrases in this game"
  End Select
 End Sub
NewPhrase will need to be called twice. Once at the start (ie in Sub Main) and once at the end of the Game. Make the change and test. Now Extend the code to 5 phrases of your choice.
Version 1.19
From the JQuery Mobile option in the toolbox add a RadioButton… Change the items to Sound On and Sound Off….

Now for the code…
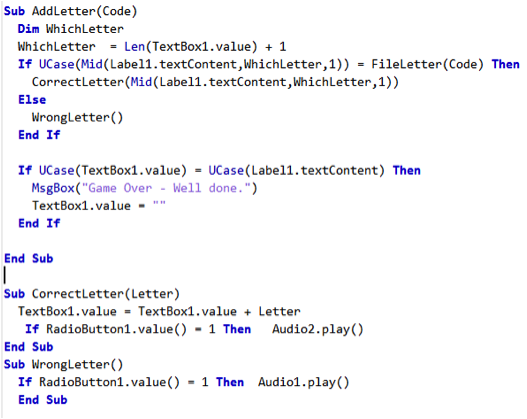
AddLetter needs two extra subroutines to process the correct and incorrect letters. These subroutines can then make a decision (IF statement) as to the value of the RadioButton1 and play a sound only if the RadioButton1 first item (Sound On) is selected….
The code now uses the text from the label rather than the Image item pressed. This means the text in the textbox will use the same case as the original entry!
The revised code….
Version 1.2
The code from the previous version can be developed further to stop the player from entering the text from the keyboard. This can be achieved by locking and unlocking the textbox at appropriate times.
To do this add…
TextBox1.readOnly = False
At the start of AddLetter to unlock the box.
Then before the End Sub of AddLetter add the following to lock the box…
TextBox1.readOnly = True
The Locking also needs to be carried out at the start of the program as well.
Finally when the Textbox1.value is reset to blank at the game over point you will need to unlock before blanking it and lock it again having blanked it!
Version 1.21
There is now an issue with the Space Bar. This is because the button does not use Addletter and the textbox is locked from reading! This needs to be fixed.
Version 1.3
A timer could be added to measure how long it takes to type the sentence in…


