Making Desktop Apps with App Studio: Difference between revisions
No edit summary |
No edit summary |
||
| (52 intermediate revisions by 2 users not shown) | |||
| Line 1: | Line 1: | ||
You can turn your | <i>Important: Chrome will be removing support for Chrome Apps on Windows, Mac, and Linux. Use ''Make Windows Executables'' instead. </i> | ||
You can turn your AppStudio apps into distributable Windows and Mac OS desktop apps, by making them into [http://developer.chrome.com/apps/about_apps.html Chrome Packaged Apps]. Users will need to have Chrome installed on their systems. The apps can be sold or given away for free in the [https://chrome.google.com/webstore/category/home Chrome Web Store]. | |||
Packaged apps deliver an experience as capable as a native app, but as safe as a web page. Just like web apps, packaged apps are written in HTML5, JavaScript, and CSS. But packaged apps look and behave like native apps, and they have native-like capabilities that are much more powerful than those available to web apps. | |||
Here's a video from Google about Chrome Packaged Apps: https://www.youtube.com/watch?v=IXDSPlVZRJE | |||
Here are the steps: | Here are the steps: | ||
=== Get your app ready === | |||
<pre>{ | |||
"name": " | There are certain restrictions on apps which are to be packaged: | ||
"version": " | |||
"description": " | # Do not use alert, confirm or prompt (JavaScript) or [[MsgBox]] (BASIC). Use NSB.MsgBox instead. | ||
"icons": { "16": " | # Do not use [[eval]](). | ||
" | # Do not use [[localStorage]] or [[Sql|SQLite]]. Use the [https://developer.chrome.com/apps/app_storage.html FileSystem API] or [http://www.html5rocks.com/en/tutorials/indexeddb/todo/ IndexedDB]. [https://code.google.com/p/chromium/issues/detail?id=339579 Complain here.] Read about the SQLite controversy [http://nolanlawson.com/2014/04/26/web-sql-database-in-memoriam/ here]. | ||
# Follow the rules in [http://developer.chrome.com/apps/contentSecurityPolicy.html Chrome's Content Security Policy]. | |||
# Check to see that you are not using any other [https://developer.chrome.com/apps/app_deprecated.html disabled web features]. | |||
}</pre> | |||
=== Check ChromeAppLaunch in Project Properties === | |||
When you're getting started, you probably will not need to modify this. It's a short JavaScript file which opens a window in the browser and loads your app. The default appheight and appwidth values are take from your project's defaultformsize property. | |||
<pre> | |||
chrome.app.runtime.onLaunched.addListener(function() {{ | |||
chrome.app.window.create("index.html", {{ | |||
"bounds": {{"width": {appwidth}, "height": {appheight} }} | |||
}}) | |||
}}); | |||
</pre> | |||
Here are the options and events you can put in this JavaScript file: | |||
http://developer.chrome.com/apps/app.runtime.html | |||
Here are the parameters you can control for the browser window you run in. There are many size and appearance options. | |||
http://developer.chrome.com/apps/app_window.html | |||
=== Check ChromeManifest in Project Properties === | |||
You probably won't have to make any changes to it to get started. The information in the ChromeManifest property is used to create the manifest.json file which Chrome Packaged Apps require on submission. | |||
<pre>{{ "manifest_version": 2, | |||
"name": "{title}", | |||
"version": "{version}", | |||
"offline_enabled": true, | |||
"description": "{description}", | |||
"icons": {{ "16": "nsb/images/16.png", | |||
"128": "nsb/images/128.png" }}, | |||
"author": "{copyright}", | |||
"app": {{"background": {{"scripts": ["background.js"]}}}}}}</pre> | |||
Go ahead and modify the paths to the icons if you have your own icons. They should be 16x16 and 128x128. If you do not supply your own, the standard AppStudio icon will be used. Format can be png, gif or jpg. | |||
Warning: Do not change any of the items which are surrounded by braces, such as {title}. These are taken from your Project Properties. | |||
The size of the window for your running app is taken from defaultformsize in Project Properties. | |||
For a complete list of manifest options, see http://developer.chrome.com/apps/manifest.html. | |||
=== Click on "Build Desktop App" in the Run menu === | |||
This will create the zip file for upload to Chrome. It will then open the [https://chrome.google.com/webstore/developer/dashboard Chrome Web Store Developer Dashboard]. | |||
=== Sign on to your Google Developer Account === | |||
If you don't have a Developer Account with Google, you will have to sign up for one. It costs $25.00 and involves clicking on some agreements. | |||
=== Upload your zip file === | |||
Select 'Add new item' and upload your zip file. Once complete, click on 'Publish to test accounts'. It will ask you for some additional information to complete the submission. Don't worry - everything is well explained. | |||
* Detailed description | * Detailed description | ||
* | * Icon: 128x128. with a 16 pixel transparent border. (Icon content is 96x96) | ||
* Screenshots: 1280x800 or 640x480 | * Screenshots: 1280x800 or 640x480 | ||
* Promotional Images: 440x280, 920x680, 1400x560 | * Promotional Images: 440x280, 920x680, 1400x560 | ||
| Line 32: | Line 80: | ||
* Regions | * Regions | ||
* Language | * Language | ||
* a few other settings | * a few other settings, all well explained. | ||
=== Publish Changes === | |||
Once everything is complete, click on "Publish changes" at the bottom of the screen. | |||
=== Let it bake. === | |||
Google will then bake your submission into a Chrome Packaged App. This will take from 5 minutes to one hour. You need to keep refreshing the screen to see if it is complete: there is no automatic notification. For testers, send them the URL for the app. Public users can find the app in the Chrome Store. (Note that they have to use the Chrome browser.) It will look like this in either case: | |||
[[File:TN10.02.png|center|600px]]<br> | |||
=== Download the App === | |||
Click on "Free" (or otherwise) to download the app to your system. The app is saved in Chrome's private storage area. | |||
=== Start App using Chrome App Launcher === | |||
You can see (and launch) Chrome Packaged Apps using the Chrome App Launcher: | |||
[[File:TN10.03.png|center]]<br> | |||
=== Start App using a shortcut (Windows) === | |||
In Windows, you can create a shortcut. First, you need to get the App ID from the URL bar: | |||
[[File:TN10.04.png|center|600px]]<br> | |||
Now, create a MyProject.bat file with the following contents: | |||
<pre> | |||
start chrome --app-id=dmnakfikpnbkojecgpkfpgcminecdcbe | |||
</pre> | |||
You can start the app by clicking on your new file or a link to it. | |||
=== Run the App === | |||
From Windows, start the app using the Chrome App Launcher or using your shortcut. | |||
From Mac, start like any other app. It is in your own username/Applications folder. You can keep it in the Dock, or start it using Spotlight. | |||
[[File:TN10.05.png|250px]][[File:TN10.06.png|250px]]<br> | |||
=== Addendum: The Chrome API === | |||
Chrome Packaged Apps can do more than regular web apps. Google has a long list of additional features they can use, including filesystem, Bluetooth, USB and serial communications. The complete list is here: | |||
http://developer.chrome.com/apps/api_index.html | |||
=== Addendum: Debugging Chrome Packaged Apps === | |||
Chrome Packaged Apps can use the standard Chrome Debugger. First, you need to enabled debugging for packed apps: | |||
[[File:Chromepackagedappdebugger.png|center|600px]] | |||
[[ | Then, you can right click on your app when it is running and choose the Inspect Element option. The standard [[Using the Chrome Debugger|Chrome Debugger]] will then appear. | ||
[[ | The app is stored in [[http://www.chromium.org/user-experience/user-data-directory User Data Directory]][Profile Dir (likely named 'Default')]/Extensions/[hash key]/version. You can open the files in that directory and edit them for quick and dirty debugging. | ||
=== Addendum: Replacing localStorage === | |||
To this, you need to use a JavaScript library which gives you functions which use localStorage or FileStorage, whichever is available in the environment you're using. | |||
Here's one by the well respected Remy Sharp: | |||
https://gist.github.com/remy/350433 | |||
Latest revision as of 16:20, 21 December 2016
Important: Chrome will be removing support for Chrome Apps on Windows, Mac, and Linux. Use Make Windows Executables instead.
You can turn your AppStudio apps into distributable Windows and Mac OS desktop apps, by making them into Chrome Packaged Apps. Users will need to have Chrome installed on their systems. The apps can be sold or given away for free in the Chrome Web Store.
Packaged apps deliver an experience as capable as a native app, but as safe as a web page. Just like web apps, packaged apps are written in HTML5, JavaScript, and CSS. But packaged apps look and behave like native apps, and they have native-like capabilities that are much more powerful than those available to web apps.
Here's a video from Google about Chrome Packaged Apps: https://www.youtube.com/watch?v=IXDSPlVZRJE
Here are the steps:
Get your app ready
There are certain restrictions on apps which are to be packaged:
- Do not use alert, confirm or prompt (JavaScript) or MsgBox (BASIC). Use NSB.MsgBox instead.
- Do not use eval().
- Do not use localStorage or SQLite. Use the FileSystem API or IndexedDB. Complain here. Read about the SQLite controversy here.
- Follow the rules in Chrome's Content Security Policy.
- Check to see that you are not using any other disabled web features.
Check ChromeAppLaunch in Project Properties
When you're getting started, you probably will not need to modify this. It's a short JavaScript file which opens a window in the browser and loads your app. The default appheight and appwidth values are take from your project's defaultformsize property.
chrome.app.runtime.onLaunched.addListener(function() {{
  chrome.app.window.create("index.html", {{
    "bounds": {{"width": {appwidth}, "height": {appheight} }}
  }})
}});
Here are the options and events you can put in this JavaScript file: http://developer.chrome.com/apps/app.runtime.html
Here are the parameters you can control for the browser window you run in. There are many size and appearance options. http://developer.chrome.com/apps/app_window.html
Check ChromeManifest in Project Properties
You probably won't have to make any changes to it to get started. The information in the ChromeManifest property is used to create the manifest.json file which Chrome Packaged Apps require on submission.
{{ "manifest_version": 2,
  "name": "{title}",
  "version": "{version}",
  "offline_enabled": true,
  "description": "{description}",
  "icons": {{ "16": "nsb/images/16.png",
             "128": "nsb/images/128.png" }},
  "author": "{copyright}",
  "app": {{"background": {{"scripts": ["background.js"]}}}}}}
Go ahead and modify the paths to the icons if you have your own icons. They should be 16x16 and 128x128. If you do not supply your own, the standard AppStudio icon will be used. Format can be png, gif or jpg.
Warning: Do not change any of the items which are surrounded by braces, such as {title}. These are taken from your Project Properties.
The size of the window for your running app is taken from defaultformsize in Project Properties.
For a complete list of manifest options, see http://developer.chrome.com/apps/manifest.html.
This will create the zip file for upload to Chrome. It will then open the Chrome Web Store Developer Dashboard.
Sign on to your Google Developer Account
If you don't have a Developer Account with Google, you will have to sign up for one. It costs $25.00 and involves clicking on some agreements.
Upload your zip file
Select 'Add new item' and upload your zip file. Once complete, click on 'Publish to test accounts'. It will ask you for some additional information to complete the submission. Don't worry - everything is well explained.
- Detailed description
- Icon: 128x128. with a 16 pixel transparent border. (Icon content is 96x96)
- Screenshots: 1280x800 or 640x480
- Promotional Images: 440x280, 920x680, 1400x560
- Website information
- Category (Education, Games, Productivity, etc.)
- Pricing and payments
- Regions
- Language
- a few other settings, all well explained.
Publish Changes
Once everything is complete, click on "Publish changes" at the bottom of the screen.
Let it bake.
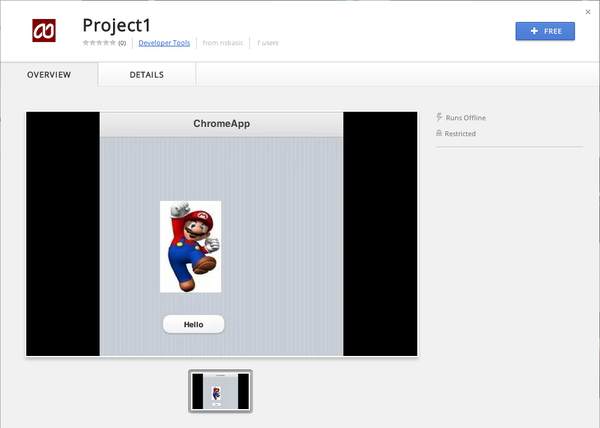
Google will then bake your submission into a Chrome Packaged App. This will take from 5 minutes to one hour. You need to keep refreshing the screen to see if it is complete: there is no automatic notification. For testers, send them the URL for the app. Public users can find the app in the Chrome Store. (Note that they have to use the Chrome browser.) It will look like this in either case:
Download the App
Click on "Free" (or otherwise) to download the app to your system. The app is saved in Chrome's private storage area.
Start App using Chrome App Launcher
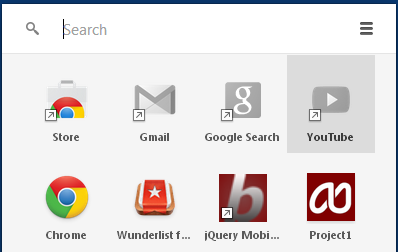
You can see (and launch) Chrome Packaged Apps using the Chrome App Launcher:
Start App using a shortcut (Windows)
In Windows, you can create a shortcut. First, you need to get the App ID from the URL bar:
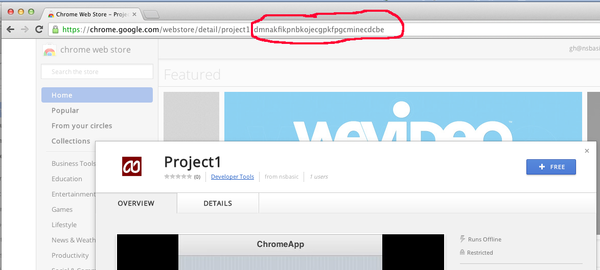
Now, create a MyProject.bat file with the following contents:
start chrome --app-id=dmnakfikpnbkojecgpkfpgcminecdcbe
You can start the app by clicking on your new file or a link to it.
Run the App
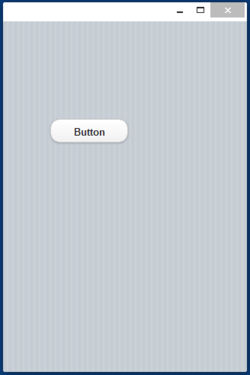
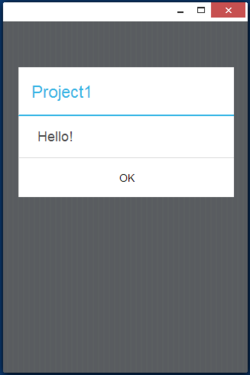
From Windows, start the app using the Chrome App Launcher or using your shortcut.
From Mac, start like any other app. It is in your own username/Applications folder. You can keep it in the Dock, or start it using Spotlight.
Addendum: The Chrome API
Chrome Packaged Apps can do more than regular web apps. Google has a long list of additional features they can use, including filesystem, Bluetooth, USB and serial communications. The complete list is here:
http://developer.chrome.com/apps/api_index.html
Addendum: Debugging Chrome Packaged Apps
Chrome Packaged Apps can use the standard Chrome Debugger. First, you need to enabled debugging for packed apps:

Then, you can right click on your app when it is running and choose the Inspect Element option. The standard Chrome Debugger will then appear.
The app is stored in [User Data Directory][Profile Dir (likely named 'Default')]/Extensions/[hash key]/version. You can open the files in that directory and edit them for quick and dirty debugging.
Addendum: Replacing localStorage
To this, you need to use a JavaScript library which gives you functions which use localStorage or FileStorage, whichever is available in the environment you're using.
Here's one by the well respected Remy Sharp:
