Tour of the IDE: Difference between revisions
m 35 revisions |
|||
| (8 intermediate revisions by the same user not shown) | |||
| Line 30: | Line 30: | ||
* Start in Desktop Browser | * Start in Desktop Browser | ||
* Deploy to a server | * Deploy to a server | ||
* Build using | * Build native app using VoltBuilder | ||
* Build Chrome Native App | * Build Chrome Native App | ||
* Debugger | * Debugger | ||
| Line 47: | Line 47: | ||
<div class="page-break"></div> | <div class="page-break"></div> | ||
<div class="page-break"></div> | <div class="page-break"></div> | ||
| Line 91: | Line 76: | ||
<div class="page-break"></div> | <div class="page-break"></div> | ||
= ToolBox = | = ToolBox = | ||
[[file:3.3. | [[file:3.3.png|right]] | ||
Controls are the building blocks for the visual elements of the form. When the Design Screen has the focus, the list of controls is displayed. | Controls are the building blocks for the visual elements of the form. When the Design Screen has the focus, the list of controls is displayed. | ||
| Line 107: | Line 92: | ||
== Libraries == | == Libraries == | ||
[[file:3.3.2. | [[file:3.3.2.png|right]] | ||
The list of Libraries displays when the Project Explorer is set to Project Properties and Global Code. | The list of Libraries displays when the Project Explorer is set to Project Properties and Global Code. | ||
* Libraries are “canned” code which can be added to your project, then used in your app. You will need to consult the documentation for these libraries to see what functions they add to your program. | * Libraries are “canned” code which can be added to your project, then used in your app. You will need to consult the documentation for these libraries to see what functions they add to your program. | ||
| Line 117: | Line 102: | ||
= Project Explorer = | = Project Explorer = | ||
[[file:3.5. | [[file:3.5.png|center]] <br /> | ||
The Project Explorer gives a layout of the project and lets you navigate through its parts. | The Project Explorer gives a layout of the project and lets you navigate through its parts. | ||
| Line 126: | Line 111: | ||
* Clicking on a control within a form will bring up the Design Screen with the control selected on it. The properties of the control will show in the Property Window. | * Clicking on a control within a form will bring up the Design Screen with the control selected on it. The properties of the control will show in the Property Window. | ||
* Use the down arrow to move the currently selected item down the list, and use up arrow to move it up. Controls higher on the list will go behind lower items if they overlap. | * Use the icon with the down arrow to move the currently selected item down the list, and use up arrow to move it up. Controls higher on the list will go behind lower items if they overlap. | ||
* Use the | * Use the trash icon to delete the currently selected item. There is no undo. | ||
* To change the name of a control or form, double click on its name in the Project Explorer, or edit the id in the [[Properties Window]] | * To change the name of a control or form, double click on its name in the Project Explorer, or edit the id in the [[Properties Window]]. | ||
* To add an external file or [[Code Modules|Code Module]] to your project, drag and drop it into the Project Explorer. | * To add an external file or [[Code Modules|Code Module]] to your project, drag and drop it into the Project Explorer. | ||
| Line 136: | Line 121: | ||
<div class="page-break"></div> | <div class="page-break"></div> | ||
= Properties Window = | = Properties Window = | ||
[[file:3.6. | [[file:3.6.png]] <br /> | ||
The project, its forms and the controls on those forms have information about them that can be edited in the Properties Window. | The project, its forms and the controls on those forms have information about them that can be edited in the Properties Window. | ||
| Line 226: | Line 212: | ||
* You can insert code from .txt, .cod, .bas or .js files. | * You can insert code from .txt, .cod, .bas or .js files. | ||
=== Customization === | |||
* To use your own settings for font, font size and tabs, select Settings. | |||
=== Help === | === Help === | ||
Latest revision as of 14:27, 13 November 2020
Menus
File Menu
- New, Open and Save Projects
- Open Samples
- Export Form/Code...
Edit Menu
- Undo/Redo
- Cut, Copy, Paste, Delete
- Code Window:
- Find, Go to line, Block Comment/Uncomment
View
- Show and hide various parts of the IDE
- Reset IDE panels
Project
- Add Forms
- Add Code Files
Format
- Useful for the Design Screen
- Align to grid
- Centering controls
- Nudging controls
Run
- Start in Desktop Browser
- Deploy to a server
- Build native app using VoltBuilder
- Build Chrome Native App
- Debugger
Tools
- Preferences
- ThemeRoller
Help
- Wiki
- Offline Wiki
- Blog
- TechNotes
- Tutorials
- Updates
Design Screen
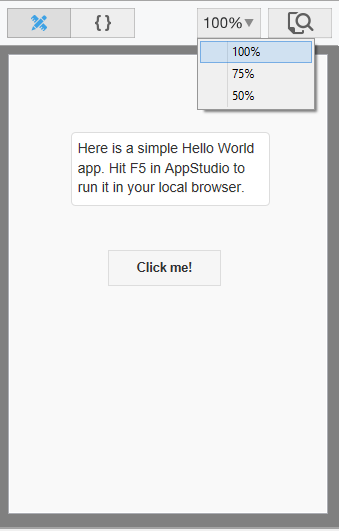
The Design Screen shows the layout of the form. A control that is outlined in blue is the control being edited. It can be moved or resized using the grab handles on the edges.
- When you mouse down on a control, lines extend to the edges to help with positioning.
- If Size to Grid is selected in the Format menu, edges of controls will be positioned to the nearest multiple of 4. This also makes it much easier to position controls so they look attractive.
- Certain controls have a fixed size, or have their size determined by their properties. These controls will not be able to be resized.
- Controls can be added to the Design Screen by drag & drop or by double clicking on the control in the Toolbox. They can also be added by right clicking on the form and selecting “Add Component”.
- Multiple controls can be selected and moved together.
Right click Options
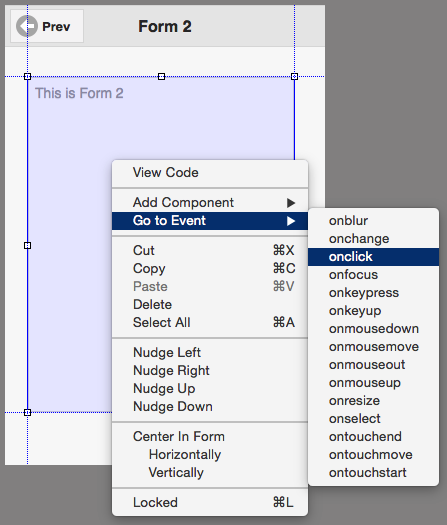
- To go to the event code for a control, right click on it and select “Go to Event”.
- To view the code, right click and select View Code.
ToolBox

Controls are the building blocks for the visual elements of the form. When the Design Screen has the focus, the list of controls is displayed.
- Controls are arranged by group.
- Groups can be opened and closed by clicking on the triangle to the left of the group’s name.
- A control may appear in more than one group.
- Controls can be added to the Design Screen by drag & drop or by double clicking on the control in the Toolbox.
Libraries
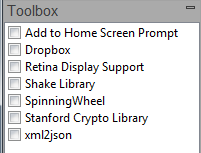
The list of Libraries displays when the Project Explorer is set to Project Properties and Global Code.
- Libraries are “canned” code which can be added to your project, then used in your app. You will need to consult the documentation for these libraries to see what functions they add to your program.
- Samples using Libraries can be found in the Libraries folder in Samples.
Project Explorer

The Project Explorer gives a layout of the project and lets you navigate through its parts.
- The top line brings up the global Code and properties for the project. A Code Window tab will open, and the project’s properties will show in the Properties Window.
- Clicking on a line that has a form will open the layout of the form in the Design Screen and the form’s properties will show in the Property Window.
- Clicking on a control within a form will bring up the Design Screen with the control selected on it. The properties of the control will show in the Property Window.
- Use the icon with the down arrow to move the currently selected item down the list, and use up arrow to move it up. Controls higher on the list will go behind lower items if they overlap.
- Use the trash icon to delete the currently selected item. There is no undo.
- To change the name of a control or form, double click on its name in the Project Explorer, or edit the id in the Properties Window.
- To add an external file or Code Module to your project, drag and drop it into the Project Explorer.
Properties Window

The project, its forms and the controls on those forms have information about them that can be edited in the Properties Window.
- If a change would affect the appearance of a form or control, the Design Screen will be updated.
- A short description of the property appears in the Help window below the Properties Window.
Some Project Properties
- A project has a large number of properties which control the app's appearance and operation.
- Here are some of the important ones for now:
| backgroundimage | The background image on the screen. |
| copyright | The copyright message. This will be placed in the generated code. |
| defaultformsize | Standard form size for most devices. If you want a size not on the list, set the height and width for each form in Form Properties. |
| description | Description of the project. Used in config.xml. |
| firstform | The name of the initial form to display. If left blank, the first form is used. If the form specified no longer exists, it will be changed to the first form on the next deploy. |
| fontfamily | The default font for all controls. Default value is Helvetica. |
| icon | The icon to be used when saved to the Home Screen. |
| id | The saved name of the project. The app is deployed under this name. |
| language | BASIC or JavaScript. If BASIC, code is converted to JavaScript before running. |
| obfuscation | Name of the external routine to obfucsate the runtime code. |
| splashscreen | An image to display as the app is loading. Do not put the file in nsb or nsb/images. |
| style | The style used by the body of the app. |
| theme | If jQuery Mobile is used, the default theme. |
| title | The public title of the program. |
| version | Version number of app. User specified. |
Code Window
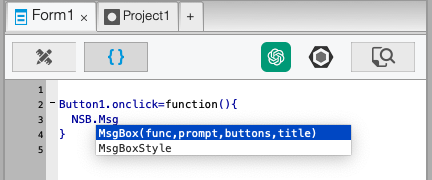
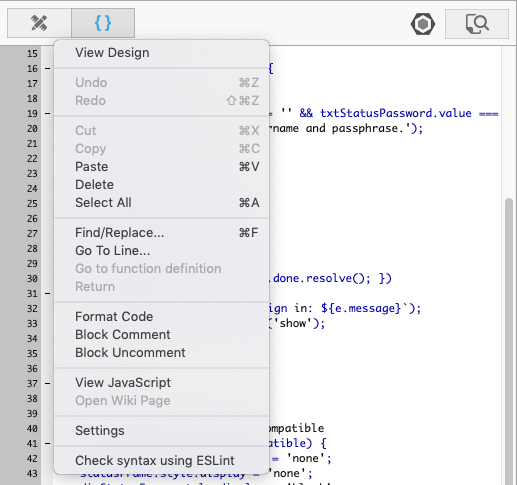
The Code Window is used the edit the code in your program.
- You can put all your code in a single block, or have a separate code block for each form as well as a global section. At runtime, they are treated as a single block, so be careful not to redefine functions or variables.
- Code can be in JavaScript, BASIC or PHP, depending on the setting in New Project, Form or Code Module properties.
Features
Editing
- In BASIC, statements can be made longer than one line by using a space and a “_” character at the end of a line.
- Syntax checking is done as each BASIC line is completed. If there is a syntax error, the line gets a red underline. If you hover over it, you can see the full error message.
- Cut, Paste, Delete and other similar functions can be used from the Menu, the Toolbar or the keyboard.
- Line numbers may be up to 99999.
Moving Around
- The dropdown bar at the top of the screen can be used to go directly to a Sub, Function or line number.
- Code Folding makes it easier to look at just the code you are interested in. Click on the minus sign to the left of a code block to collapse it.
- To go directly to a function in your program, select the name of the function elsewhere in your code, right click and select "Go to function definition."
Translation
- If you are working in a language other than JavaScript, you may view the translation of the code. Do a right click and select "View JavaScript". You can do this for the whole module or just a selection.
Inserting Code
- To insert code from an external file, drag and drop the file from the Finder into the Code Window.
- The code will be inserted into your app at the current position, just as if you had typed it in.
- You can insert code from .txt, .cod, .bas or .js files.
Customization
- To use your own settings for font, font size and tabs, select Settings.
Help
- To bring up the Wiki page for a keyword, select the word, right click and select "Open Wiki Page".
Wiki
All documentation about AppStudio is contained in a Wiki file.
- A wiki is a user editable set of documentation.
- AppStudio uses the same wiki software as Wikipedia.
- Documentation in the Wiki is easy to keep up to date.
- Text is fully searchable.
- Documentation can have links to related topics embedded in the text.
- Available in offline version.