Libraries: Difference between revisions
No edit summary |
|||
| (29 intermediate revisions by 2 users not shown) | |||
| Line 1: | Line 1: | ||
= AppStudio Libraries = | = AppStudio Libraries = | ||
[[file:3.3.2.png]] | |||
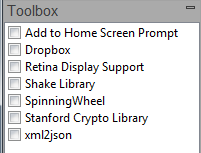
Libraries are optional modules which can be included in your project. You can see the list by selecting "Project Properties and Global Code" in the Project Explorer. Use the checkboxes to select the libraries you need. | |||
== Add to Home Screen Prompt == | == Add to Home Screen Prompt == | ||
== | [[File:Ath-preview.png|Ath-preview.png]] | ||
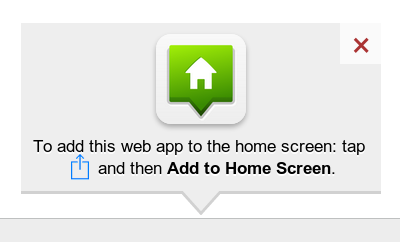
[http://cubiq.org/add-to-home-screen Add to Home Screen] opens an always-on-top message inviting the user to add the application to the home screen. This is currently supported on iOS and Mobile Chrome. While other devices have the ability to bookmark any website to the home screen, only iOS and Mobile Chrome have a straightforward way to do it. | |||
To use it, simply enable the checkbox. | |||
== BASIC == | |||
This [[:Category:BASIC Functions|BASIC library]] adds all the functions used for compatibility with BASIC. Only use this option if your app is all in JavaScript. If any part of your project is in BASIC, the library is automatically included. | |||
== EasyModal == | == EasyModal == | ||
[[File:Modal.png]] | |||
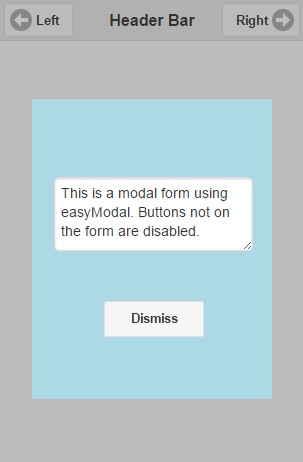
[http://flaviusmatis.github.io/easyModal.js/ EasyModal] is a library which lets you turn a form into a modal window. EasyModal was removed from AppStudio in version 5 and replaced with [[Modal Forms|Modal Forms]]. | |||
A Modal Form is a form which floats above your app. The user can only respond to the form: any controls on the form behind it are disabled. | |||
Modal forms are created by taking a regular form and making it modal. So, to create a modal form, start with a regular form and populate it with whatever controls are needed. Set fullScreen to False and the height and width to the size you want. | |||
Here is code to initialize and display the modal window the first time: | |||
<pre> | |||
Function Button2_onclick() | |||
Dim parms = {} | |||
parms.autoOpen = True | |||
parms.top = Modal1.Top | |||
parms.overlayOpacity = 0.3 | |||
parms.overlayColor = "#333" | |||
parms.overlayClose = False | |||
parms.closeOnEscape = False | |||
$(Modal1).easyModal(parms) | |||
$(Modal1).trigger("openModal"); | |||
End Function | |||
</pre> | |||
For subsequent calls to open the same modal window, only one line should be used: | |||
<pre> | |||
Function Button3_onclick() | |||
$(Modal1).trigger("openModal"); | |||
End Function | |||
</pre> | |||
Full details on the display options are [http://flaviusmatis.github.io/easyModal.js/ here]. | |||
To dismiss a modal window, do this: | |||
<pre> | |||
Function btnDismiss_onclick() | |||
$(Modal1).trigger("closeModal"); | |||
End Function | |||
</pre> | |||
== Retina Display Support == | == Retina Display Support == | ||
= | When you load a page, [http://retinajs.com retina.js] checks each image on the page to see if there is a high-resolution version of that image on your server. If a high-resolution variant exists, the script will swap in that image in-place. | ||
The script assumes you use Apple's prescribed high-resolution modifier (@2x) to denote high-resolution image variants on your server. | |||
For example, if you have an image on your page that looks like this: | |||
<pre> | |||
<img src="/images/my_image.png" /> | |||
</pre> | |||
The script will check your server to see if an alternative image exists at this path: | |||
<pre> | |||
"/images/my_image@2x.png" | |||
</pre> | |||
== SpinningWheel == | == SpinningWheel == | ||
''This control is deprecated in AppStudio 7. It is no longer being maintained by its author.'' | |||
[[File:Spinningwheel.jpg]] | |||
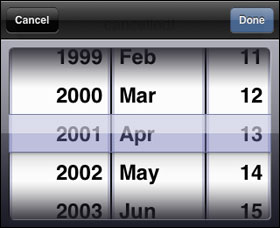
[http://cubiq.org/spinning-wheel-on-webkit-for-iphone-ipod-touch SpinningWheel] lets you create a picker with spinning wheels. There is excellent documentation on [http://cubiq.org/spinning-wheel-on-webkit-for-iphone-ipod-touch Cubiq's site], and a sample in folder 7. | |||
== Stanford Crypto Library == | == Stanford Crypto Library == | ||
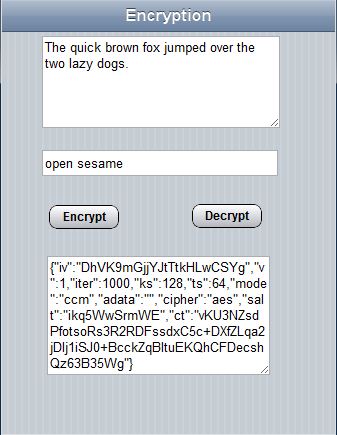
Encryption is easy to do in AppStudio using an encryption library. For the purposes of this post, we'll use the <a href="http://crypto.stanford.edu/sjcl/">Stanford JavaScript Crypto Library</a>. It uses the industry-standard AES algorithm at 128, 192 or 256 bits; the SHA256 hash function; the HMAC authentication code; the PBKDF2 password strengthener; and the CCM and OCB authenticated-encryption modes. Just as importantly, the default parameters are sensible: SJCL strengthens your passwords by a factor of 1000 and salts them to protect against rainbow tables, and it authenticates every message it sends to prevent it from being modified. | |||
[[File:Encrypt.jpg]] | |||
Encryption works by supplying a password which is used to scramble the text in such a way that it is virtually impossible to unscramble without that password. | |||
There are two important functions: encrypt(password, text) and decrypt(password, text). | |||
Here is how you would use them in a program: | |||
<pre> | |||
Function btnEncrypt_onclick() | |||
txtEncrypted.value=sjcl.encrypt(txtPassword.value, txtPlain.value) | |||
End Function | |||
Function btnDecrypt_onclick() | |||
txtPlain.value=sjcl.decrypt(txtPassword.value, txtEncrypted.value) | |||
End Function | |||
</pre> | |||
sjcl is the reference to the encryption library. It is created as a result of the inclusion of the library in the project. Once your data is encrypted, you can save it to a database or send it to another computer. | |||
== xml2JSON == | == xml2JSON == | ||
App Studio includes the handy xm2json() library from [http://www.fyneworks.com/jquery/xml-to-json/#tab-Overview Fyneworks]. | |||
The xml2json() function will then convert the XML string to a data structure that can be addressed directly. | |||
<pre> | |||
data=$.xml2json(req.responseText) | |||
</pre> | |||
Latest revision as of 17:33, 12 April 2024
AppStudio Libraries
Libraries are optional modules which can be included in your project. You can see the list by selecting "Project Properties and Global Code" in the Project Explorer. Use the checkboxes to select the libraries you need.
Add to Home Screen Prompt
Add to Home Screen opens an always-on-top message inviting the user to add the application to the home screen. This is currently supported on iOS and Mobile Chrome. While other devices have the ability to bookmark any website to the home screen, only iOS and Mobile Chrome have a straightforward way to do it.
To use it, simply enable the checkbox.
BASIC
This BASIC library adds all the functions used for compatibility with BASIC. Only use this option if your app is all in JavaScript. If any part of your project is in BASIC, the library is automatically included.
EasyModal
EasyModal is a library which lets you turn a form into a modal window. EasyModal was removed from AppStudio in version 5 and replaced with Modal Forms.
A Modal Form is a form which floats above your app. The user can only respond to the form: any controls on the form behind it are disabled.
Modal forms are created by taking a regular form and making it modal. So, to create a modal form, start with a regular form and populate it with whatever controls are needed. Set fullScreen to False and the height and width to the size you want.
Here is code to initialize and display the modal window the first time:
Function Button2_onclick()
  Dim parms = {}
  parms.autoOpen = True
  parms.top = Modal1.Top
  parms.overlayOpacity = 0.3
  parms.overlayColor = "#333"
  parms.overlayClose = False
  parms.closeOnEscape = False
  $(Modal1).easyModal(parms)
  $(Modal1).trigger("openModal");
End Function
For subsequent calls to open the same modal window, only one line should be used:
Function Button3_onclick()
  $(Modal1).trigger("openModal");
End Function
Full details on the display options are here.
To dismiss a modal window, do this:
Function btnDismiss_onclick()
  $(Modal1).trigger("closeModal");
End Function
Retina Display Support
When you load a page, retina.js checks each image on the page to see if there is a high-resolution version of that image on your server. If a high-resolution variant exists, the script will swap in that image in-place.
The script assumes you use Apple's prescribed high-resolution modifier (@2x) to denote high-resolution image variants on your server.
For example, if you have an image on your page that looks like this:
<img src="/images/my_image.png" />
The script will check your server to see if an alternative image exists at this path:
"/images/my_image@2x.png"
SpinningWheel
This control is deprecated in AppStudio 7. It is no longer being maintained by its author.
SpinningWheel lets you create a picker with spinning wheels. There is excellent documentation on Cubiq's site, and a sample in folder 7.
Stanford Crypto Library
Encryption is easy to do in AppStudio using an encryption library. For the purposes of this post, we'll use the <a href="http://crypto.stanford.edu/sjcl/">Stanford JavaScript Crypto Library</a>. It uses the industry-standard AES algorithm at 128, 192 or 256 bits; the SHA256 hash function; the HMAC authentication code; the PBKDF2 password strengthener; and the CCM and OCB authenticated-encryption modes. Just as importantly, the default parameters are sensible: SJCL strengthens your passwords by a factor of 1000 and salts them to protect against rainbow tables, and it authenticates every message it sends to prevent it from being modified.
Encryption works by supplying a password which is used to scramble the text in such a way that it is virtually impossible to unscramble without that password.
There are two important functions: encrypt(password, text) and decrypt(password, text).
Here is how you would use them in a program:
Function btnEncrypt_onclick()
  txtEncrypted.value=sjcl.encrypt(txtPassword.value, txtPlain.value)
End Function

Function btnDecrypt_onclick()
  txtPlain.value=sjcl.decrypt(txtPassword.value, txtEncrypted.value)
End Function
sjcl is the reference to the encryption library. It is created as a result of the inclusion of the library in the project. Once your data is encrypted, you can save it to a database or send it to another computer.
xml2JSON
App Studio includes the handy xm2json() library from Fyneworks.
The xml2json() function will then convert the XML string to a data structure that can be addressed directly.
data=$.xml2json(req.responseText)
