PayPal: Difference between revisions
No edit summary |
No edit summary |
||
| Line 46: | Line 46: | ||
[[Category:Language Reference]] | [[Category:Language Reference]] | ||
[[Category:Controls]] | |||
Revision as of 16:23, 24 August 2012
Description
The PayPal control allows you to collect money from PayPal for sales, subscriptions and donations. PayPal is available in many countries. It’s much easier to set up and use than a credit card.
First, set yourself up as a PayPal Merchant. Assuming you already have a PayPal account, go to the Merchant Services tab on the main screen. On the left, you will see a tab called “Website Payments Standard”. Click on that and follow the instructions.
Once you are set up as a merchant, you will need to set up your product. The easiest way to do that is on the Merchant Services page: Choose the “Buy Now button” option. Enter a number of fields, including item name, item ID (a reference number for your own use), price, currency (21 choices!), shipping and tax info. Once complete, click on ‘Create Button’.
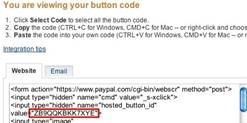
It will go to a new page, showing the code for the button. You’re interested in the string just after “value=”. In this case, it is “ZB9QQKBKK7XYE”. Copy into hostedButtonID in the control’s properties.
Properties
| hostedButtonID | The ID number assigned by PayPal. |
| TransactionType | Buy, Donate, Subscribe or Unsubscribe. Kind of PayPal transaction. Determines which icon appears. |
| addField(field,value) | Additional fields to send to PayPal. Both are strings Examples of fields are “item_name”, “item_number”,”custom”, where "custom" is a valid PayPal user defined field that is ultimately passed to the Instant Payment Notification server script. |
Events
Standard events are supported.
Example
PayPal1.addField("custom","my custom string")
Output
(the PayPal payment screen appears)

